Forward
This user manual is for Spike software only. Spike software embraces the rules set down by the Australian Government to administer Child Care Subsidy on behalf of a Service and Families.
The Spike manual does not replace the Childcare Provider Handbook for all approved child care services operating under the Child Care Subsidy System (CCSS). The above-mentioned handbook is the defining information and rules legislated by the Federal Government. Spike software helps you to administer these legislated rules and compliancy issues.
Contact & Support Information
This manual is not your only resource. If you have any queries, problems or even suggestions, contact the Helpdesk.
-
Helpdesk telephone: (08) 8220 0502
-
Request Spike Help Desk Callback (in the Spike Viewer → System)
-
Email: helpdesk@economicoutlook.net
-
Spike Business Systems: 124 Sturt St, Adelaide SA 5000
-
Office telephone: (08) 8231 0941
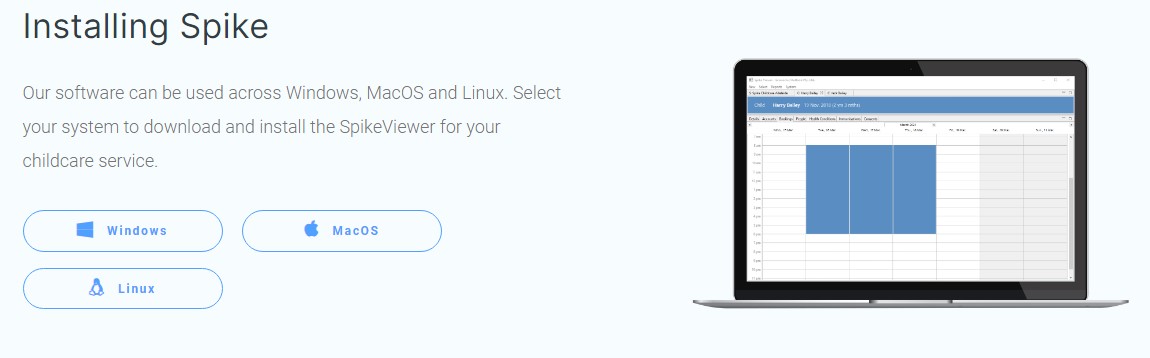
How to download and update Spike
The Spike Viewer is available to download on Windows, MacOS and Linux.
|
Tip
|
If you have a Windows operating system and have a shortcut on your desktop you will need to remove it (right click/delete) |
-
Go to Spike Website / install
-
Select your operating system
Windows download
-
The program will start to download - usually in the bottom left hand corner of your screen.
-
If the SpikeViewer installer does not run automatically, double click on the download file, or right click 'open when done'.
-
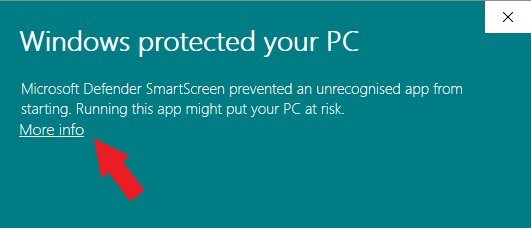
If windows Defender tries to block the install select more info….
-
Run anyway

-
The Spike welcome wizard starts → select Next
-
Install for anyone using this computer → Install
-
When the install is complete → Next → Finish
MacIOS download
-
The program will start to download in your download folder
-
Once complete click on the download folder and select the Spike viewer download
-
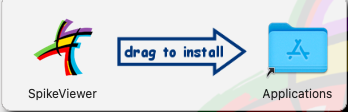
Drag SpikeViewer to applications to install
-
If you already have a file called SpikeViewer → replace
Linux download
-
Contact the helpdesk
Understanding Spike
Spike works by collecting information about your service, your policies, your clients etc which it then interprets using a vast amount of embedded childcare business rules to accomplish tasks. Your task is to tell the system about the things you know, as soon as possible and as accurately as possible.
At the core of its organisational structure, the booking and billing component of the Spike software is a database for compiling information about real things that we call objects. The primary objects that the system tracks are:
-
Account – An account is for billing purposes. It has details of where to address/email the tax invoice, the linked children and the financial transactions, e.g. childcare fees, childcare subsidy, receipts and misc transactions. The account holder is a person who Centrelink recognise as the eligible CCS Individual. Note, the Account name may be the same as the person’s name.
|
Tip
|
It is essential to understand the difference between an account and a person. |
-
Child – A child is the one who receives child care, and for which an individual (such as the child’s parent) may be eligible to receive Child Care Subsidy or Additional Child Care Subsidy.
-
Person - A person has a relationship with a Child in your Service, it may be a parent, uncle, grandparent or any other person authorised to be responsible for the child at some time. Data is kept about these persons such as contact details, relationship to child and access details. These persons are not necessarily responsible for paying the childcare fees.
-
Group – A group represents either a room, e.g. Babies or Toddlers, or simply a Group of children that attend at a certain time, eg After School Care, that exist within your Service.
-
Service – A service can be either Centre Based Care, OSHC, Family Day Care and In Home Care which all offer different types of care.
-
Organisation – An organisation is the overriding body with management of the Service.
You tell the system what you know about these objects and it will call upon this information whenever it is needed.
Navigating the Spike Viewer
The Spike Viewer has various menus at the top of the screen that you can make your selection from.
Menu
The menu system is the starting point to navigate to information of interest, eg you might be looking up an account or finding a report.
New
Under the heading New you can create a new Account , new Child, new Person and if required a new Service.
New → Account
A new Account is created with the use of a 3 page wizard. The wizard creates the Account, the Account Holder (eligible CCS person) and the Child. It also links the three objects.
|
Tip
|
It is always a good idea to search in existing account, person and child lists before creating new in Spike. Change the Status to Any to search the entire database. |
Sometimes families may give you the incorrect account holder (CCS eligible person) and you will need to change the Account Holder.
New → Child
A new Child will need to be created when a sibling is to be added to an existing Account (after initial account wizard).
Enter the Child’s Details, Bookings, People, Health Conditions, Immunisations and Consents.
|
Tip
|
When creating a Child, if you get an error “CRN already in use” it means that the child has already been entered into Spike → Search for the Child again and change status to Any. |
New → Person
Here you can create a new person.
-
Enter first and last name, date of birth & gender
-
Contact details
-
CRN
-
Tick if allowed access to Parents’ Child Care app
|
Tip
|
If you get an error “CRN already in use” it means that the person has been entered into Spike twice. Search for the person again, remember to change status to Any. |
New → Service
Do not use unless instructed by the help desk
Select
This is where you can search and select an account, a child, a group, a person or service.
Select → Account
To select an account enter the account name, highlight, OK.
The default option is to display current accounts, to view all accounts change status to Any.
Select → Child
To select a Child enter the Child’s first name or last name, highlight, OK.
The default option is to display current children, to view all children change status to Any.
Select → Group
To select a Group, either double click on the Group or highlight the group, OK.
Select → Person
To select a person enter the person’s first name or last name, highlight, OK.
The default option is to display current people, to view all people change status to Any.
Persons are Account holders (Client) and / or collection authorities, legal guardians, emergency contacts (Contact) or Employees.
Select → Service Select your service, OK.
This is where you can view and edit your Services details. For example, you can add or change your bank account details which are displayed on your invoices.
Reports
Spike has a comprehensive reporting system.
Account
Spike has numerous reports focusing on Accounts
Account → Accounts List: Displays a list of all account names, addresses, email accounts Y/N, email addresses, and CRNs. Select service, next, right click, select account/s, finish.
Account → Accounts List (Active) Displays a list of current account names, addresses, email accounts Y/N, email addresses, and CRNs. Select service, next, right click, select account/s, finish.
Account → Accounts Receivable Summary: An aged accounts receivable report. Lists account names, aging monies owed, 28+, 14+, 7+, current, as at date and future. Enter date, default, next. Select account/s, finish.
Account → Bond Summary: Summary of bonds paid and owing. Enter date, select account/s.
Account → Financial Account Detail: A report displaying a list of financial account transactions on one or multiple accounts that have occurred on an account or all accounts. Transactions that can be reported: Bad debts, bonds, childcare subsidy, child care fees, excursions, late collection fees, opening balances, other and receipting. Account names are included in this report. Categories created in the financial accounts tab in service detail screen can also be selected. Enter date range, select account/s, next, select financial account/s, finish.
Account → Financial Account Statement by Account Type: A report displaying a list of all transactions on an account for a selected date range, by account type, eg Child Care Fees, Child Care Subsidy, Recipts. Enter date range, select account/s, finish.
Account → Financial Account Statement by Date: A report displaying a list of all transactions on an account for a selected date range. Enter date range, select account/s, finish.
Account → Financial Account Summary: A report displaying a list of financial account transactions on one or multiple accounts that have occurred on an account or all accounts. Transactions that can be reported: Bad debts, bonds, childcare subsidy, child care fees, excursions, late collection fees, opening balances, other and receipting. This is a summary report therefore no account names are listed.
Categories created in the financial accounts tab in the Service can also be selected. Enter date range, select account/s, next, select financial account/s, finish.
Account → Financial Account Transaction Disbursement: A report displaying a list of account transactions, username and date/time. Enter date range, select account/s, next, select financial account/s, finish.
Account → Financial Account Transaction History: A report displaying an audit trail for each account. Shows date and type of transaction. Enter date range, select account/s, next, select financial account/s, finish.
Account → General Journal Postings (New and Original): A report displaying assets, income and liabilities. Enter date range and cost centre.
Account → Receipts Summary by Date or By Payment Method: A report displaying a summary of receipts entered against accounts for a date range driven by you. Enter date range, right click select all, and click finish.
Account → Tax Invoice: Tax invoices can be printed from here. Select service, date range, next. Select account/s, finish.
Account → Tax Invoice – Billing Summary: Summary of tax invoices for a date range. Enter date range, select account/s, finish.
Account → Tax Invoice Number - Account Name List: A report displaying a list of invoice numbers and account names. Enter date range and cost centre, finish.
CCS
Spike has numerous reports focusing on Child Care Subsidy
CCS → Enrolment Advance Liabilities: A report displaying a list of recovered enrolment advance payments. Enter date range and cost centre, finish.
CCS → CCS Enrolment Detail: A report displaying a child’s enrolment status, including their enrolment ID, CRN, date of birth, enrolment status (see below) sessions and entitlements.
-
Enter date range, tick your Service, NEXT. Select account/s, FINISH
-
Enrolment status (explained)
-
CONFIRM: Confirmed - parent has successfully completed CWA & has confirmed the enrolment
-
REJECT: Rejected - parent has rejected enrolment
-
WITHDR: Withdrawn - service has withdrawn the enrolment
-
CEASE: Ceased - enrolment has reached its end date or has de-activated due to 14 weeks of inactivity
-
PENDIN: Pending Confirmation - parent has not confirmed the 200a (initial enrolment notice)
-
DISPUT Disputed - parent has disputed the enrolment & the enrolment is awaiting update/amendment by service (service to complete enrolment update notice)
-
RECEIV: Submitted / Received - this is an informal enrolment (no CRN). Will not be sent to parent for confirmation until CRN is entered by service
-
PENDEL: Pending Eligibility - parent assessment not yet completed by DHS (Centrelink)
-
|
Tip
|
To search an enrolment ID go to Reports → CCS → Enrolment Detail. Enter date range, tick your service, NEXT. Right click, select all. Your document will open as a PDF. CTRL F to search your document and enter / paste enrolment ID. |
CCS → Enrolment Entitlements: A report displaying account name, child name, enrolment ID, enrolment status, entitlements and absence count. Select date range, tick approval, next. Select account/s.
CCS → Fees and Subsidies: A report displaying a list of fees and subsidies for a date range. Select date range and cost centre, finish.
CCS → Inclusion Support Case Claims: A report displaying a list of ISS cases and the claims made against them. Enter date range, tick approval, finish.
CCS → Inclusion Support Cases: A report displaying a list of ISS cases and relevant information received from the ISS portal. Enter date range, tick approval, finish.
CCS → Inclusion Support Child and Staff Attendances: A report displaying a list of staff and children attached to a claim – this report is especially handy if you get an error report from Spike – “the sum of additional educator hours is not equal to hours claimed”. The staff member will have (*). Enter date range, tick approval, finish.
CCS → Issues Summary: A report displaying a list of enrolments with a PENDEL, PENDING, REJECTED or DISPUTED status, and the status of your PRODA device. Enter date range, tick approval, finish.
CCS → Payment Advice Summary: A report displaying a list of payments made by CCS on a particular date / date range. Enter date range, tick approval, finish.
CCS → Payment Advice Summary by Transaction Code: A report displaying payments made by CCS on a particular date / date range, including transaction codes. Enter date range, tick approval, finish.
CCS → Payment by Clearing Date: A report displaying payments made by CCS on a particular date / date range by account and clearing document number. Enter date range, tick approval, finish.
CCS → Payments by Date Paid: A report displaying payments made by CCS on a particular date / date range by account. Enter date range, tick approval, finish.
CCS → Personnel Detail: A report displaying all personnel in Spike Maintenance and their role type and description. Select Approval, finish.
CCS → Session Report Record Summary: A report displaying session reports for a child / account – start date, end date, status, booking times and attendance times and fee reduction amount. Enter date range, tick approval, finish.
CCS → Statement of Entitlements: A report displaying the above details but also who has received the entitlement, the amount of the entitlement and shows a reason if no or varied amount of entitlement has been received. Enter date range, tick approval, finish.
Child
Spike has numerous reports focusing on the child
Child → Birthday List by Birthday: A report displaying children’s names, date of birth, age and birthday, by birthday for a selected date range. Enter date range, select child/ren.
Child → Birthday List Child Name: A report displaying children’s names, date of birth, age and birthday, by child name for a selected date range. Enter date range, select child/ren.
Child → Booking Confirmation → Excluding Session Charges: A report displaying children’s names with booking times. Enter date range, select child/ren, finish.
Child → Booking Confirmation →Including Session Charges: A report displaying children’s names with booking times and charges. Enter date range, select child/ren, finish.
Child → Registration List by Current Date (with next booking): A report displaying children’s names, registration date, withdrawn date, next booking, account holder and account name. Select child/ren, finish.
Child → Registration List by Date Range: A report displaying children’s names, registration date, withdrawn date, account holder and account name. Enter date range, select child/ren, finish.
Child → Age List: A report displaying current children by age. Includes child’s name, date of birth, birthday and age. Select child/ren, finish.
Child → Booking Session Abnormalities: This report highlights booking errors. It reports two error issues:
Enter date range, select child/ren, finish.
-
Booking sessions assigned to unexpected services types. Eg ASC bookings with AM times.
-
Bookings extending beyond session charge boundaries. Eg ASC booking entered for 2pm to 6pm but the session charge times are 3.30pm to 6pm.
Child → Immunisation Contacts: A report displaying children’s current immunisation status, by surname, together with their associated contacts and contact details. Select Service, finish.
Child → Immunisation Status: Shows Children in categories Overdue, Due, Available, Immunised and Not in Schedule. Select Service, finish
Child → Survey Details: A report displaying children’s names, date of birth, age, disability, special needs, Aboriginal, TS Islander, In State Care. Select child/ren, finish.
EFT
Various reports relating to Spike’s electronic attendance system
Paystream → Getting Started: Information regarding how to apply for Paystream.
Paystream → Terms & Conditions: Information regarding the terms and conditions of your partnership with Paystream.
Paystream → Client Details: A report displaying client names, payment details and EFT schedules.
Paystream → Credit Card Authority: Print these out for your account holders to complete.
Paystream → Direct Debit Authority: Print these out for your account holders to complete.
Paystream → Settlement Report: Displays a list of all of the scheduled payments.
Paystream → Transaction Detail: Displays each scheduled payment including full details.
Paystream → Transaction Progress: Displays a list of all of the scheduled payments and their status eg. pending, successful, etc.
Forms
Forms that are automatically prefilled with your Service details.
Forms → Administration:
-
Incident Report
-
Payment Voucher
-
Remittance Advice
Forms → Childcare > Booking Notification > LDC/OSHC: A form that your service can use to inform families of bookings that have become available.
Forms → Childcare → Enrolment > New / Update > LDC/OSHC: An enrolment form prefilled with your Service details.
Forms → Childcare → Child Accident Report: An accident form prefilled with your service details.
Forms → Childcare → Medication Day Sheet: A form to be completed by both parents and staff with relation to a child’s medication.
Forms → Childcare → Notification of Changes: A form for parents to complete to inform your service of leave or changes to the child’s current bookings.
Forms → Childcare → Waiting List Application: A waiting list application form prefilled with your service details.
Forms → Staff: Various forms that mcan be used by your service in relation to staffing.
-
Details
-
Discipline Interview Record
-
Leave Application
-
Probation Review Record
-
Referee Comments Record
-
Selection Interview Record
-
Work Performance Improvement Plan
Group
Spike has numerous reports broken up by group.
Group → Accounts List: A report displaying account names, addresses, email accounts Y/N, email addresses, and CRNs. Select service, next, right click, select account/s, finish.
Group → Accounts Receivable Summary (by Group): An aged accounts receivable report displayed by Group. Lists account names, aging monies owed, 28+, 14+, 7+, current, as at date and future. Enter date, default, next. Select account/s, finish.
Group → Active Carers: Report for IHC – provides a list of active carers for a date range. Enter date range, select group/s, finish.
Group → Child Age List By Group: A report displaying current children by group, by age. Useful for transitioning children to new groups. Includes child’s name, date of birth, birthday and age. Enter date range, select group/s, finish.
Group → Child Count for each Group and Service (Distinct): A report displaying the number of children per group by date range. This is a child count not booking/attendance count. Enter date range, select group/s, finish.
Group → Child List: A report displaying children’s names, date of birth and CRN in alphabetical order by group. This can be used to search a child’s CRN. Enter date range, select group/s, finish. You can also amalgamate groups.
Group → Collection Authorities: A report displaying children’s names and their collection authorities with contact details by group. Enter date range, select group/s, finish.
Group → Consents by Group Bookings: A report displaying children’s names and consent details by group. Enter date range, select group/s, finish. You can also amalgamate groups.
Group → Dietary and Health Considerations by Group: A report displaying children’s dietary and health conditions by group. Enter date range, select group/s, finish. You can also amalgamate groups.
Group → Emergency List: A report displaying children’s names and their emergency contacts with contact details by group. Enter date range, select group/s, finish.
Group → Recorded Attendances Daily: A report displaying who has signed a child in / out using the electronic the attendance system. Enter date range, select group/s, finish.
Group → Recorded Attendances Daily Not Verified: A report displaying who has signed a child in / out using the electronic the attendance system, and whether the attendance has been verified by a collection authority. Enter date range, select group/s, finish.
Group → Recorded Attendances Not Verified: A report displaying past attendances that have not been digitally verified. When attendances are older that 6 weeks they can no longer be verified using the electronic attendance system. When printed, this report enables parents to verify older past attendances by way of signature.
Group → Recorded Attendances Outside Charged Hours: A report displaying children whose attendances are not within the charged hours. Can be used to charge late fees. Enter date range, select group/s, finish.
Group → Weekly Booked Hours Summary: A report displaying weekly booked hours by day and week total. Also calculates total number of hours for date range (if longer than 1 week). Enter date range, select group/s, finish.
Group → Weekly Booking Category Summary: A report displaying the total number of children in each group each day. Enter date range, select group/s, finish.
Group → Weekly Booking Sheet: This is the weekly sign in and out sheet for each group that is needed to comply with regulations. (If not using electronic attendance system – but can also be used as a backup).
Group → Weekly Booking Sheet (Blank): This is a blank weekly sign in and out sheet. Enter date range, select group/s, finish.
Group → Weekly Booking Times and Categories: A report displaying children’s bookings, by day, by group, with totals. Enter date range, select group/s, finish.
Group → Weekly Booking Times by Charge: A report displaying children’s bookings, by charge, by day, by group, with totals. Enter date range, select group/s, next. Select charge, finish.
Group → Child Count Summary: A simple report showing the number of children per group, per day with a weekly and service total. Enter date range, select group/s, finish.
Group → Weekly Recorded Attendance Hours Summary: A report displaying weekly attended hours by day and week total. Also calculates total number of hours for date range (if longer than 1 week). Enter date range, select group/s, finish.
Person
Spike has numerous reports focusing on the person
Person → Parent Childcare App login details: A report displaying account name, account holder (person), their email address and whether they can log into the Parent Childcare App.
Group → Pin Codes by Group: A report displaying pin codes by group.
Group → Pin Codes by Service: A report displaying pin codes by alphabetical order.
Room
Spike reports used daily in each room.
Room → Daily Booking Sheet: This is the daily sign in and out sheet for each group that is needed to comply with regulations (if not using electronic attendance system – but can also be used as a backup). Enter date range, select group/s, finish.
|
Tip
|
If you leave the from date blank Spike will automatically use the current date |
Room → Daily Booking Sheet (Blank): Blank daily sign in sheet. Enter date range, select group/s, finish.
Room → Kitchen- Dietary and Allergy Report: A report displaying children’s dietary & allergy concerns. A report to have in the food prep area. Enter date range, select group/s, finish.
Room → Weekly Booking Sheet: This is the weekly sign in and out sheet for each group that is needed to comply with regulations (if not using electronic attendance system – but can also be used as a backup). Enter date range, select group/s, finish.
Room → Weekly Booking Sheet (Blank): This is a blank weekly sign in and out sheet. Enter date range, select group/s, finish.
Staff
These reports are valuable tools for staff rostering.
Staff → Utilisation by Bookings: A report displaying staff ratio requirements by bookings in 15 minute intervals.
Staff→ Utilisation by Recorded Attendances: A report displaying staff ratio requirements by recorded attendances in 15 minute intervals.
Utilisation
Reports to review children’s attendance numbers in a variety of ways.
Utilisation → Utilisation by Billed Charged Hours Detailed: A report displaying weekly billed charged hours by child by group. Enter date range, select group/s, finish.
Utilisation → Utilisation by Billed Charged Hours Summarised: A report displaying weekly billed charged hours by group. Enter date range, select group/s, finish. You can also amalgamate groups.
Utilisation → Utilisation by Booked Charged Hours Detailed: A report displaying weekly booked charged hours by child by group. Enter date range, select group/s, finish.
Utilisation → Utilisation by Booked Charged Hours Summarised: A report displaying weekly booked charged hours by group. Enter date range, select group/s, finish. You can also amalgamate groups.
Utilisation → Utilisation by Bookings Graph: Useful graph to use for staffing needs. Enter date range, select group/s, finish. You can also amalgamate groups.
Utilisation → Utilisation by Bookings by FTE (Full Time Equivalent) forecast: A report that calculates fees per day per week and calculates full time equivalent number of children needed to reach that $ amount. Used for budget forecasting. Enter date range, select group/s, next. Select charge (usually your fulltime charge eg day), finish.
Utilisation → Utilisation by Charge: A report that gives you a daily average $ amount per charge. Enter date range, select group/s, next. Select charge, finish.
Utilisation → Utilisation by FTE (Full Time Equivalent): A report that calculates fees per day per week and calculates full time equivalent number of children. Enter date range, select group/s, next. Select charge (usually your fulltime charge eg day), finish.
System
Here you can find important links to use along side the Spike Viewer.
System → PRODA Website
You can use this link when re-activating your PRODA device.
|
Important
|
This is also how you can access the Provider Entry Point (PEP). PEP is part of the secure CCS system. We highly recommend that you do not use PEP as Spike has its own version, CCS Maintenance. |
System → Spike Website Our new look website has all of our latest manuals. You can also download the latest Spike Viewer.
System → Spike Parent’s Childcare App
The parent childcare app allows parents to view their child/rens invoices and statements, current and upcoming bookings, emergency contacts, immunisation status (if recorded), allergy / dietary requirements and for Services who choose the online booking option, parents are able to book and / or cancel bookings. You can also send correspondence eg Newsletters, Activities, Notes, Alerts etc
System → Spike CCS Maintenance
This is Spike’s version of the Provider Entry Point. Login with your Spike User Name and Spike password.
Through the Spike maintenance interface Services can:
-
find your CCS Provider and Service CCS ID’s
-
apply for ACCS Child at Risk
-
access CCS Correspondences
-
update Childcare Finder webpage
-
add Personnel
System → Spike’s Electronic Attendance System
Our electronic attendance system takes the hard work out of entering actual attendance times for administrators by allowing parents and their collection authorities to record a child’s arrival and departure.
System → Spike Correspondence
Correspondence can be created and viewed by both the Spike Viewer and your iPad/tablet.
System → Request Spike Help Desk Callback
Enter your name, phone number and details and our help desk will call you back.
System → Exit Exit Spike Viewer
Screens
The following screens allow you to edit, manage and add information.
Account
The Account screens involve all items of interest relating to the account, they can be viewed and managed.
Details tab - shows if the Account is currently active, the Account Holder’s name, email address, whether invoices are to be emailed and postage details. To edit the details right click edit. To add a comment double click on Comments.
|
Tip
|
To open the account holder right click Open Person. This ensures you are looking at the correct person attached to the account. |
Children tab – shows the Children attached / registered to the account. From here you can Add, Update or Remove a child. To withdraw a child right click > Update > Enter a withdrawn date. You can also access Reports > Child.
|
Tip
|
Double clicking on the Child’s name opens up their details screen. |
Billing tab - Displays the billing periods, and if they have been billed / finalised.
-
The default date is the current date and default "show previous" bill periods is 8 (but you can increase this) by using the arrows.
-
The billing period is always Monday to Sunday.
-
The dots will either be green, yellow or grey.
Green dot Billing complete (if account not emailed),
Green dot Billing complete, tax invoice emailed.
Yellow dot Billing complete, tax invoice has not been emailed.
Grey dot Not finalised, booking alterations accepted.
(Finalised means you have sent your session reports to the CCS system)
Fees tab – This is the transaction screen displayed in date sequential order (the most recent transactions are at the top). In the fees tab you can create Miscellaneous Transactions, Receipts, EFT payments, EFT schedules, EFT authorities and reverse transactions.
Child
The Child screens involves all items of interest relating to the Child, they can be viewed and managed.
Details Tab – Child’s name, DOB, gender, CRN, In State care and a tick box for if the child is Medically eligible for additional immunisations. To edit the details right click edit. To add a comment double click on Comments.
Accounts Tab – Displays the Account(s) that the child is Registered to. You can double click on the Account name and it will take you to the Account details screen.
Bookings tab – Displays the Child’s current and past bookings. “Blue” bookings are unfinalised and can be edited/deleted. If your service uses our Parent Childcare App, bookings created online are displayed in green when unfinalised. “Orange” bookings are finalised and cannot be updated, unless the period is unfinalised.
|
Tip
|
Click on the calendar at the top, dates that are red indicate that there are bookings on that day. |
People Tab – Displays a list of the child’s collection authorities, legal guardians, emergency contacts and access restrictions.
To add People: (The person must already exist in Spike, if not create new person)
-
Right click, Add → Select the person, the type of relationship and tick the other relevant boxes.
-
If using our electronic attendance system, it is important to have all emergency contacts and collection authorities entered onto Spike so that a unique 6 digit pin is created for each person.
|
Tip
|
You can copy people from one sibling to another. |
Health Conditions Tab – displays any health and/or dietary information regarding the Child. To add a health conditon right click → Create. Select the condition, severity and complete relevant information.
|
Tip
|
To create a new Heath Condition → select Organisation → Health Conditions → right click, create condition OR whilst in the Child’s Health Condition Tab right click > Open Health Conditions |
Immunisations Tab – Once you have the Child’s Immunisation History Statement you can update the Child’s immunisation status > Right click and select action. It is important to keep the Child’s immunisation status up to date, especially if you are using our immunisation reminder system.
|
Tip
|
With the introduction of COVID-19 vaccinations for children, you can no longer right click select all. To select all other vaccinations highlight the vaccination under COVID-19, hold the shift key and arrow down, right click Immunised. |
Consents Tab - The consents are created/edited in your Service detail tab. They need to reflect policy and procedure of your Service. These consents are printed on your enrolment forms through Spike reports. Once parents have signed off against these consents, record if granted.
Person
The Person screens involve all items of interest relating to the person, they can be viewed and managed.
Details tab - shows current information for the person. The DOB and CRN are essential for persons who are Account Holders and who are wishing to claim childcare subsidy. All persons on Spike are allocated a unique 6 digit pin for use with our electronic attendance system. If your servie uses the Parent Childcare App tick the box to enable access to the parent’s childcare app (email address required).
Children tab – shows which children are linked to that person and their relationship. Double click on the Child’s name and you will be taken to the Child’s details screen.
Attendances – This is only to be used to create an attendance for the purpose of claiming Inclusion Support funding (Employees only).
Group
The Group screens involve all items of interest relating to Groups, they can be viewed and managed.
Details tab – a list of the groups within in your Service. To open the group either double click on the group name or right click > Open Group. If you need to add a group, Right click > Create. Type in the name of the group, tick is user selectable, OK.
Attendances tab – displays a list all of the children who have bookings for the chosen day.
If you are NOT using our electronic attendance system this is where you edit the arrival and departure times of children who attended the service. Right click on the child’s name, edit. Enter the starting and finshing times, OK.
If you are using our electronic attendance system check that all children’s attendance details are entered and appear in black. To mark a Child absent, right click, Record Absence.
All names and times for each day should appear in black before you send your session reports (finalise) to the CCS system.
If you wish to remove ALL bookings for a selected perion of time eg, Christmas Closure or Public Holiday, right click Group Closure.
|
Important
|
Do not create a Child’s booking here - only enter bookings via the Child’s booking screen. |
Preferred Utilisation and Booking Request Policy tabs are used to setup your policies and utilisation for the online bookings component of our Parent Childcare App.
Service
The Service screens involves all items of interest relating to your Service.
Details tab – Displays the details about your Service. The information displayed here is what is printed on various reports, tax invoices etc. To edit your Service information, including your bank account details that show on your tax invoices, right click Edit.
Charges tab – Displays a list of all of your charges.
Here you can create a new charge or edit a current charge.
Groups tab – a list of the groups within in your Service.
Here you can view, add and edit Groups.
Employees Tab – Displays a list of employees.
Here you can view, add and edit employees.
|
Important
|
Do not remove employees, end date them to retain historical ISS data. |
Attendances Tab - displays a list of all of the children’s attendances on the effective date, for all Groups, in alphabetical order. You can manually record your attendances here.
Billing tab – Here you can send your session reports to the CCS system (finalise), add messages to your invoices, add Miscellanous Transactions to all accounts and email or print your invoices.
You can also generate EFT Payments
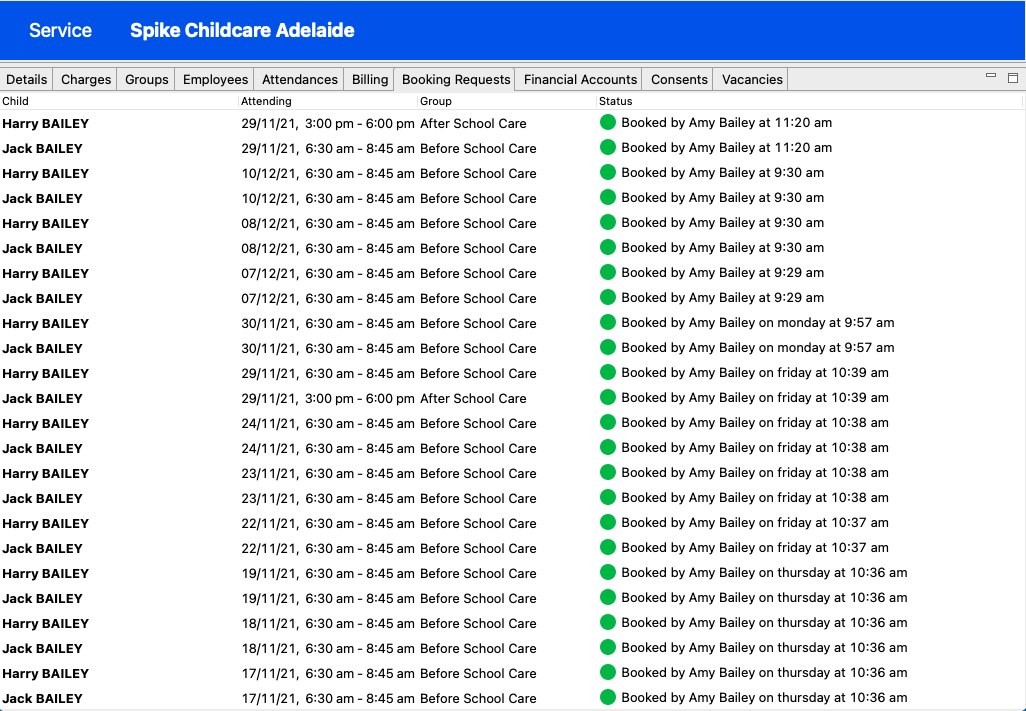
Booking Requests tab - Lists all bookings requested and cancelled through parent app and Spike Viewer in chronological order.
Financial Accounts tab – Lists all financial accounts realting to your Service. To create a new account right click create. Enter details or edit if incorrect.
Consents tab - consents are created/edited here. They need to reflect the policies and procedures of your service. These consents are printed on your enrolment forms through Spike reports.
To edit a Consent right click → edit or double click on the Consent. Make the necessary changes, OK.
To create a new Consent, right click > Create.
To delete a consent right click > Delete
Vacancies tab - Reporting your vacancies must be done on a weekly basis BEFORE 5pm Friday of the week prior.
Organisation
Details Tab -Displays the information about your “Organisation” . This is the Incorporated Body, the Sponsor, the Body corporate etc – the group that holds ultimate responsibility for the Service/s. To update the information right click, edit.
User Accounts tab – Displays Spike user accounts and whether they are active.
To Create a new User:
-
Right click, create.
-
Select Service, Person and tick is allowed to log in. (They must be a person in Spike and be an employee)
-
Username is the person’s first name followed by @ your Service suffix (data base name), all lower case.
-
Enter password (twice)
-
Select a permission.
Health Conditions Tab -This is where you create health and dietary conditions for the children at your service. Double click to edit an existing one. Right click create to make a new one.
Tasks
Creating an Account / Enrolment
New families are entered into the database from details provided on enrolment forms.
|
Important
|
It is vital that information about the child and the CCS eligible individual (date of birth and CRN) are correct. Incorrect details will prevent an Arrangement to provide care in return for fees. |
There are four types of Arrangements (see Childcare Provider Handbook..). The CWA (Complying Written Arrangement) is the most often agreed arrangement between the Service and Individual. Details of the CWA (enrolment notice) are submitted when the child’s first week of care is received by the CCS system. The Individual then must confirm the enrolment notice through their Centrelink online account (via MyGov) or contacting Centrelink. Once confirmed and a CCS claim (assessment) has been lodged by the Individual, subsidy will be paid.
Details entered through the Account wizard provide some of the information required for an enrolment notice, hence accurate data entry is paramount. To commence the wizard:
-
Select New → Account → enter name of Account, select Service and opening date → Next.
-
Account holder window: (If the account holder is a person already in Spike, search by first and last name. If they are not a person in Spike you can create them here) Enter required details → Next
-
Child window: Select child’s relationship to the Account holder. (If the child is already in Spike search by first and last name. If they are not already in Spike you can create them here) Enter required details → Finish
After the wizard is finished, fill in details in the Account screen (email/postage details etc), Person screen (contact details etc) and Child screen.
If the account has been created with the incorrect account holder you will need to change the account holder.
|
Tip
|
If there are multiple children , you will need to create the Child through the new Child menu, then link to the Account. |
To link a Child to an Account, select Account, Children tab, right click Add.
Emergency contacts/collection authorities can be copied from one sibling to another.
Change an account holder
In CCS it is much harder to 'swap' an account holder.
To see if you can 'swap' the account holder:
-
Open both the person who is currently linked to the account, and the person who you would like to change the account holder to
-
Make a note of their DOB’s and CRN’s and then try to delete the CRN. If you are able to delete the CRN swap all information from one person to the other
-
If Spike will not allow you to delete the CRN, you must create a new Account with the correct person as the account holder (remember to back date the account start date)
-
Open the current account and unfinalise all of the bookings
-
Go to each of the child/ren’s bookings. Under 'Care Provided' change the account to reflect the new account
-
Go to the billing tab of the new account and finalise all weeks in new account.
-
Transfer any receipts and /or miscellaneous transactions to new account (Re-enter them in the new account and reverse them out of the old account)
-
In the details tab of the old account enter an end date (right click edit)
-
In the children tab of the old account right click on the child’s name → Remove
Entering Bookings
Once the Account is created, the bookings can be entered. Each different time that the child will be attending the Service must be entered separately.
To enter bookings:
-
Select Child → Bookings Tab
-
Left click on the start time, hold down and drag the mouse down to the finish time → Create Booking screen (or double click on the day → Create Booking screen)
-
In the Create Booking screen, enter and check details (Account, Group, times and Charge). For sessions to be sent to the CCS system ensure both CCS tick boxes are ticked. Sessions are always Standard and enrolment is left as Standard (CWA) → click OK
|
Tip
|
If the child is absent only select Absent as the absence reason, unless the child has used their initial 42 Absences, then select the appropriate Additional Absence reason. |
To copy this booking to another day:
-
Right click on the booking, copy
-
Right click on the day you want the booking, paste.
You have now created a template for a week.
To repeat the bookings:
-
Right click Repeat Bookings
-
Repeat the weeks bookings, every week, second, third or fourth week.
-
Enter dates or the number of weeks → OK
To repeat just one booking:
-
Left click on the booking, a thin black line will appear around the booking.
-
Repeat the selected bookings, every week, second, third or fourth week.
-
Enter dates or the number of weeks → OK
To repeat a selection of bookings:
-
Whilst holding the shift key down, left click on each booking you would like to repeat. A thin black line will appear around the selected bookings.
-
Repeat the selected bookings, every week, second, third or fourth week.
-
Enter dates or the number of weeks → OK
If the child transitions groups you can change the group in all future bookings.
-
Right click Transition Groups
-
Select effective date and the group the child is transitioning to → OK.
To copy bookings to siblings:
-
Right click Copy Bookings to Sibling
-
Select child and dates → OK
|
Tip
|
In OSHC databases, closure dates for After School & Before School care have been automatically entered according to the Education Department term times.(see Group, Preferred Utilisation tab) To override the Group closure warning download the latest Spike Viewer. |
Attendances
Child Care services are required to submit actual atttendance data (in addition to session hours). The actual attendance times refer to the true time a child was signed in and out of care. Weekly finalising can only be done after the close of business Friday or when the last child has left your service. Then all attendance times can be accurately recorded for all children for the week.
Entering times manually
To enter times manually from your attendance sheets:
-
Select Group → Attendances tab (or Select → Service → Attendances tab.)
-
All children who have a booking for that day will be listed in grey.
-
Right click on the child’s name → edit or double click over the from time.
-
Update Attendance times, OK.
-
The child’s name and updated time/s will now appear in black.
-
Continue until you have recorded all from and to times for all children.
-
If the child is absent, right click on child’s name → Record Absence.
-
Before sending your Session reports to Canberra (finalising) check that all of the children in all of your Groups, have to and from times recorded. (They will appear in black.)
|
Tip
|
Changing times in the Attendances tab does not change the booking. The booking remains the same. |
Spikes Electronic Attendance System
Our Electronic Attendance System takes the hard work out of entering actual attendance times through Spike Viewer.
Billing procedures / Finalising
The CCS system requires up to 48 hours to process the submitted Sessions and to calculate subsidy payments.
-
Ensure all bookings are entered and correct for the billing week
-
Ensure all attendance times for all children have been entered either manually or via Electronic Attendance System
To send your session reports to the CCS System (finalise).
-
Go to Select → Service (select your service) → Billing tab
-
Select the correct billing week.
-
Right click → Select All → right click → Finalise. (You can use Finalise Preview to view the estimated fees for your families BEFORE finalising.)
|
Important
|
Please note with the introduction of reporting exact times finalising cannot be done until the last child leaves your service on a Friday afternoon. |
The status of the accounts will change from orange "Billing the Account" to "Billing Complete, Tax Invoice has not been emailed, OR if the invoice is to be printed the status will be green "Billing Complete".
-
Once the CCS has been paid into the accounts, the invoices can be printed or emailed.
|
Tip
|
We recommend that you Auto Balance each week before you email / print your invoices. This will auto offset all credits against the oldest debts in the accounts. To Auto Balance right click select all, right click Auto Balance, answer yes to the question and wait for the process to finish. |
Emailing Tax Invoices
To email tax invoices:
-
Go to Select → Service (select your Service) → Billing tab
-
Select the correct billing week.
-
Right click → Select All → Right click → Auto Balance → Right click →Email / Generate Tax Invoices, OK.
The status of the account will change to green 'Billing Complete, tax invoice emailed'.
|
Tip
|
You can email tax invoices to mulitple email addresses by separating them with a comma (no space) |
To print Tax Invoices:
-
Go to Select → Service (select your Service) → Billing tab
-
Select the correct billing week.
-
Right click → Select All → Right Click → Auto Balance → Right click →Reports → Tax Invoice, Finish.
This will produce a PDF that can then be printed. Only those accounts that are not emailed are printed.
Create / Manage tax invoice messages
-
Go to Select → Service (select your Service) → Billing tab
-
Right click Create
-
Enter date range, your message, next.
-
Select individual accounts or right click, select all, finish.
Create bulk miscellaneous transactions
Here you can add a miscellaneous transaction / charge to all of your accounts
-
Go to Select → Service (select your Service) → Billing tab
-
Select the correct billing week.
-
Right click →select all → Right click Misc Transaction.
|
Important
|
The spike CCS processing summary emails which you receive daily are a transcript of information exchanged between Spike and the CCS system - they are extremely useful in tracking the processing of CCS and also identifying any warnings or issues. |
Creating EFT Authorities & Schedules
Spike uses a payment gateway (Paystream) to process payments via direct debit or credit card, which is automatically reconciled against families fees.
For more information see our EFT manual.
Creating / editing and updating charges
To create a new charge:
-
Right click create. Enter name of the charge, tick “Is selectable”. CCS session type is always casual
-
In the parameters tab right click create
-
Enter start date, a Monday
-
Select type, (we highly recommend using Session). If you are unsure, our Help Desk will advise you
-
Enter the fee amount (no dollar sign)
-
Before entering data into the overtime charges please contact our Help Desk
-
Enter the start and finish times for the session
-
Click OK
|
Important
|
Ensure correct am/pm in the times |
-
This takes you back to the charge details screen
-
Select categories tab
-
Right click create
-
Select AM or PM or if all day select both.
To update a charge:
Increasing your fees is a 3-step process
STEP ONE – Updating the charge
-
Select Service (select your service) → Charges Tab
-
Double click (or right click edit) on the charge - this brings up the charge details screen.
-
Right click on the current charge → Copy
-
Right click → Paste (this prefills all of the details of the charge for you)
-
Edit the start date, type is pre-filled (we recommend session) and fee (no dollar sign)
-
The session details are pre-filled - check for correct AM & PM → OK
|
Tip
|
By copying and pasting the charge it retains all of the informaiton from the previous charge |
STEP TWO – Updating fee information with Canberra and families myGov / Centrelink accounts
Once you have confirmed all of the children’s attendance times for the first week of the fee increase go to:
-
Select → Service (select your service) → Billing (as you would normally)
-
Right click select all → right click → Submit CCS Enrolment Update → OK
-
Right click → Finalise
STEP 3 - Updating Childcare Finder / Starting Blocks Website
-
Go to System → Spike CCS Maintenance
-
Enter your Spike username and password
-
Click on your Service name
-
Go to the 3 dots at the top right hand corner → Profile
-
Go back up to the 3 dots at the top right hand corner. Under Mychild (heading in bold) select and update your Contact details, Opening Hours and Fees.
|
Tip
|
Spike Maintenance does not hold this information. If you go back into these areas the information will not show, but it will have been sent to the Child Care Finder Website (it can take up to 48 hours for the website to be updated) |
To edit a charge:
You would only edit a charge if the incorrect details had been entered eg. incorrect AM and PM.
-
Select Service (select your service) → Charges Tab
-
Double click (or right click edit) on the charge - this brings up the charge details screen
-
Double click (or right click edit) on the most charge you want to edit
-
Make necessary adjustments → OK
|
Tip
|
If an error message appears it means bookings that have been finalised are currently linked to the charge. Run the weekly bookings by charge report |
To change a charge name:
-
Select Service (select your service) → Charges Tab
-
Double click (or right click edit) on the charge - this brings up the charge details screen
-
Double click on the charge name (in bold)

-
Edit the charge name → OK
Miscellaneous Transactions
Bulk miscellaneous transactions
You can create a miscellaneous transaction for all of your families at once, eg Annual registration fee.
-
Go to Select → Service (select your service)
-
Billing tab
-
Right click → select all
-
Right click → Misc transaction
-
Enter the description, select the category, date and amount, OK
|
Tip
|
To create a miscellaneous transaction for multiple accounts (but not all) hold the CTRL key down whilst selecting relevant accounts |
Bonds
A Bond is held in trust by the Service. The bond system improves the Service’s cash flow and minimises bad debts when children are withdrawn from care. The bond amount is determined by the Service’s procedure for setting bonds. For example, the bond may be set at the equivalent of two weeks of the family cost of child care. To manage bonds:
-
Create Bond: Select Account → Fees tab → right click, Create Misc Transaction. Enter Description (Bond), Category (Bond), Date and Amount → OK
-
Payment of Bond: Select Account → Fees tab → right click, Create Receipt. Enter payment details → OK
-
Refund of Bond: Select Account → Fees tab → right click, Create Misc Transaction. Enter Desciption (Bond refund), Category (Bond), Date and Amount (-$) → OK
Fee Adjustments
Occasionally an Account will be in credit when a child has finished care. To refund the overpayment:
-
Select Account → Fees tab → right click, Create Misc Transaction. Enter Description (Refund overpayment of Fees), Category (Other), Date , Amount and Cost Centre → OK
An account may have debit balance that is not recoverable:
-
Select Account → Fees tab → right click, Create Misc Transaction. Enter Description (eg write off, rounding, bad debt etc), Category (Bad debt if appropriate, or Other), Date, Amount (-$) and Cost Centre → OK
Late Fees
A Service may impose a late collection fine for children picked up after session finish time. The Service late pick up policy will determine the fine amount. The fine should be added before tax invoices are issued for the week in which the late pick up occurred. To add the fine:
-
Select Account → Fees tab → right click, Create Misc Transaction. Enter Description (date of late pickup), Category (Late Collection Fee), Date, Amount and Cost Centre → OK
Receipting
When payment is made on behalf of an account, it must be entered into the database thus ensuring the accuracy and currency of the account record.
-
Select Account → Fees tab → right click, Create Receipt. Enter details of Number (can also be a description), Date, Amount (no dollar sign), Method and Cost Centre → OK.
-
The next screen, Balance Transactions, offsets the amount against open financial transactions → Allocate or click OK to auto offset.
Group Closure
Use the Group Closure function when you want to either mark all bookings as absent or remove all bookings in bulk for a specific date or a date range.
You can create a group closure in 2 ways.
To create a Group Closure via Service:
-
Select → Service → Group tab
-
Right click on relevant group → Group Closure
-
Enter the from and to dates
-
Select action…
-
remove bookings if your service is not charging for the closed day(s)
-
update absences if you service is charging for the closed day/s (you must select absence reason 'absent')
-
-
OK
To create a Group Closure via group:
-
Select → Group → Attendances tab
-
Go to the relevant day
-
Right click → group closure
-
Check the from date is correct and enter the to date
-
Select action…
-
remove bookings if your service is not charging for the closed day(s)
-
update absences if you service is charging for the closed day/s (you must select absence reason 'absent')
-
-
OK
|
Important
|
If you mark the bookings absent you can reverse this by creating another group closure on the same day but leave the absence reason blank, BUT, if you remove the bookings it is extremely IMPORTANT that you choose the correct dates as this cannot be reversed |
Update Care Provided
You use this function when you want to change a charge in multiple bookings eg. change ASC charge to early close, or charge 50% for a public holiday, for all bookings for a day,
To do this go to:
-
Select → service → group tab
-
Right click on the relevant group → update care provided
-
Enter the date
-
Update bookings from the current charge to the new charge
-
OK
|
Tip
|
If you have 2 charges eg ASC casual and ASC permanent repeat the above for both charges |
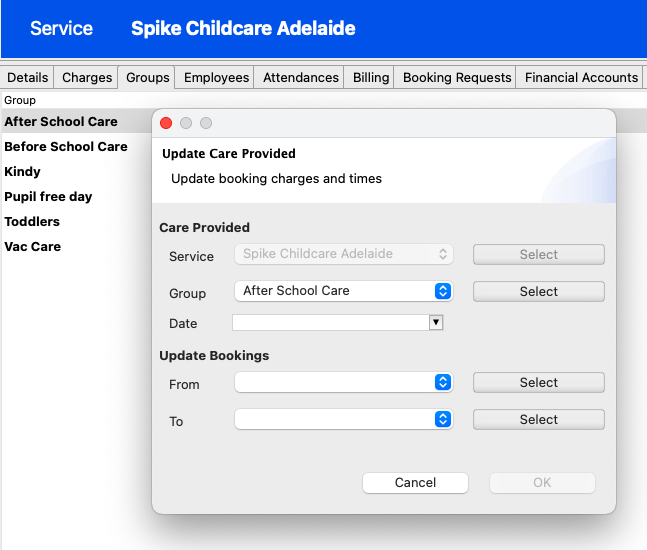
You can also perfrom an 'Update care provided' via select → group. Right click, select all or you can select multiple children by selecting the children whilst holding down the CTRL key. Right click, update care provided.
Closing Accounts
Upon the conclusion of care and payment resulting in a zero balance, (or once a fee adjustment has been made), the Account can be closed and the child/ren withdrawn.
To close the account:
-
Go to Select Account and select the relevant account.
-
Whilst in the details tab, right click → edit
-
Enter the closed date (date of last transaction)
-
OK
To withdraw a child/ren
-
Whilst in the account select the children tab
-
Right click over the child’s name → update
-
Enter to date (last date of care)
-
OK
|
Tip
|
The account will remain in the database. To find the account change status to any when searching. The account can be re-opened by removing the closed date. |
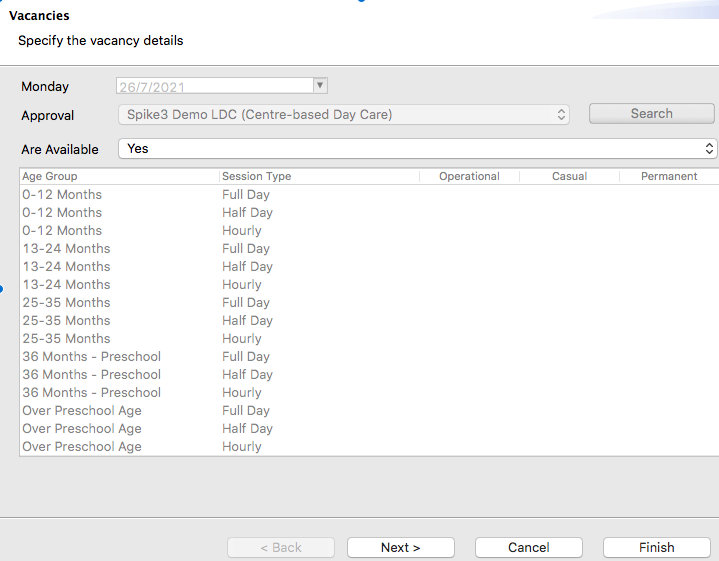
Reporting Vacancies
-
Go to Select → Service (select your service) → Vacancies tab
-
Double click on your service name.
-
This brings up a 7 page wizard, one page for every day of the week.
-
The day of the week appears at the top.
-
Where is says "Are Available", simply answer YES or NO as to whether you have vacancies or not.
-
To get to the next day click Next and continue answering yes or no until you have completed every day of the week, Finish.
See example below.
Updating Childcare Finder / Starting Blocks
-
Go to System → Spike CCS Maintenance
-
Enter your Spike username and password
-
Click on your Service name
-
Go to the 3 dots at the top right hand corner → Profile
-
Go back up to the 3 dots at the top right hand corner. Under Mychild (heading in bold) select and update your Contact details, Opening Hours and Fees.
|
Tip
|
Spike Maintenance does not hold this information. If you go back into these areas the information will not show, but it will have been sent to the Child Care Finder Website (it can take up to 48 hours for the website to be updated) |
Accounting For Service’s monies
Reports
Receipt Summary Report Printing a Receipt Summary by Date (or Payment Method) allows reconciliation with receipt books, bank statements or whatever means the payment is acknowledged by the Service. It checks that the amount entered into the database against the Account is correct.
General Journal Postings (Original) report
The General Journal Postings report is used at the end of each month to derive the journal entries required by your accounting package to ascertain the monthly profit/loss. The Profit/Loss report will list income and expenditure transactions for the month by consolidating the journal postings from the report and regular payments to creditors each month.
|
Tip
|
It is recommended that you review previous General Journal Postings to identify any retrospective changes that may have occured during this period. Any change is likely to be due to backdated CCS payments and adjustment journals are required to balance. |
-
Accounts Receivable (Spike) - includes the value of childcare fees, miscellaneous income, bonds and bond refunds, less the value of subsidies received by the accounts (families) ie the parent proportion. This amount is a debit and treated as an Asset and must be posted to an appropriate asset account.
-
Parent Fee Income - the childcare fees less subsidies. This amount is a credit and treated as Income and must be posted to the appropriate income account.
-
Miscellaneous Income - includes the value of charges such as Late Collection fees, Fundraising fees etc. This amount is a credit and treated as Income and posted to appropriate income accounts. To ascertain a detailed list of all charges, print the Financial Account Detail report.
-
Bonds - includes the value of bonds, adjustments and refunds raised to accounts. This is a credit but since bonds are money owed to the families, it is a Liability and must be posted to the appropriate Liability account.
-
Accounts Receivable (CCS) - includes the value of CCS subsidies raised to accounts (families) for the month. It also includes payments to the Service for Inclusion support and Operational support. These are a debit and treated as an Asset and must be posted to an appropriate asset account.
-
Subsidies - includes the value of CCS and ACCS paid to accounts. This amount is a credit and treated as Income and must be posted to the appropriate income account.
-
Inclusion Support - a Service payment to assist in the provision of education and care of children with additional needs (see how to claim under Additional tasks). This amount is a credit and treated as Income and must be posted to the appropriate income account
-
Operational Support - a Service payment. This amount is a credit and treated as Income and must be posted to the appropriate income account.
-
Balance Sheet Balances - after journals are posted, the balances on the General Journal Postings report should be the same as the closing balances of the equivalent accounts within your accounting package
-
Accounts Receivable (Spike) - is the total of the fees outstanding (money owed by families) as at the end of the specified month
-
Bonds - is the total of bonds held as at the end of the specified month
-
|
Note
|
The above can be performed on a monthly basis, quarterly or as frequently as desired. The reports are date driven so can be generated over any time period. |
Additional CCS Tasks
Creating an Additional Child Care Subsidy (child wellbeing)
Where a child has been assessed as being 'at risk' your Service can apply for Additional Child Care Subsidy (child wellbeing) For more information relating to Certificates and Determinations with extended from dates and / or extended duration see our ACCS (child wellbeing) manual.
Creating a Certificate
|
Important
|
The enrolment must be CONFIRMED and eligible for CCS to be eligible for ACCS. |
-
In Spike go to System → Spike CCS Maintenance
-
Log in using your Spike username & password
-
Click on your Service name under Services
-
Scroll down to Enrolments
-
On the right-hand side, click on Filter
-
Enter either the child’s CRN, the person’s CRN or the enrolment ID, Search
-
The child’s name will be displayed
-
Click on the child’s name and you will be taken to the child’s enrolment screen
-
Whilst in the enrolment screen click on the three dots at the top right-hand side and select Child at Risk
-
Enter from date –This is the date that you want the Certificate to start. This can be backdated up to 28 days. The from date must be a Monday.
-
Next
-
Select the most appropriate risk/s (you can select more than one)
-
The start date is pre-filled from the first page
-
Use the dropdown box to select the duration (maximum duration is 6 weeks)
-
Tick both boxes under Declarations
-
Click on Create
If submission has been succesful you will be taken back to the Child’s Enrolment screen.
Click on the back arrow to go back to the child’s enrolment screen. Under ACCS you will see the Certificate. Certificates are approved immediately.
Creating a Determination
BEFORE starting a Determination ensure you have a copy of the evidence to be uploaded, saved as a PDF, on your desktop. Make a note of the date of the evidence. Evidence must be less than 6 months old.
|
Important
|
The enrolment must be CONFIRMED and eligible for CCS to be eligible for ACCS. |
-
In Spike go to System → Spike CCS Maintenance
-
Log in using your Spike username & password
-
Click on your Service name under Services
-
Scroll down to Enrolments
-
On the right-hand side, click on Filter
-
Enter either the child’s CRN, the person’s CRN or the enrolment ID, Search
-
The child’s name will be displayed
-
Click on the child’s name and you will be taken to the child’s enrolment screen
-
Whilst in the enrolment screen, scroll down to ACCS and make a note of the oldest Certificate or Determination start date. This is the ‘first at risk date’, the date your Service first became aware that the child was at risk. Also note down the end date of the current Certificate or Determination.
-
Click on the three dots at the top right-hand side and select child at Risk
-
Enter the from date for the Determination. This is the date that you want the Determination to start. This is either the following Monday after the current Certificate or Determination expires, or, you can backdate up to 28 days. The from date must be a Monday
-
Next
-
Select the most appropriate risk/s (you can select more than one)
-
The first at-risk date is the date your service first became aware that the child was at risk. This is the date you noted previously, the oldest certificate or determination start date
-
The from date is pre-filled from the previous page
-
Use the dropdown box to select the duration (maximum duration is 13 weeks
-
The Date of notice is the date of the evidence you are uploading, that you noted at the start. The evidence must be less than 6 months old
-
Source: If your evidence is from the State/Territory Government the Source will be Notified By State/Territory. If your evidence is from a non-government organisation the Source would be Notice to State/Territory (you are notifying the State that the child is at risk).
-
Type in the Agency name
-
Use the drop-down list to select the Agency Type
-
If you have selected Source: Notified by State Territory you need to upload the document to both Third Party Evidence AND State/Territory Notice by clicking on Attach. This will open your file manager, find and choose your file – it must be a PDF. If attached correctly the Attach button will turn blue. If you have selected Source: Notice to State/Territory attach the evidence to Third Party Evidence only.
-
Tick declaration, and
-
Click on Create
If submission has been succesful you will be taken back to the child’s enrolment screen. The status of the Determination remains UNKNOWN until a decision has been made.
|
Tip
|
To find out if the Determination has been approved or rejected go to System > Spike CCS Maintenance. Log in using your Spike username & password. Click on your Service name under Services. Scroll down to Correspondences. Click on Fetch and Save. The letter will be saved in your downloads. |
Adding employees into Spike
-
Add the person onto Spike
-
Go to New → Person - you only need to enter their first and last names and gender
-
Select → Service → Employees
-
Right click → Add
|
Important
|
Do not remove Employees, end date them to retain historical ISS data. |
Adding a Spike user account
-
Select → Organisation → User accounts
-
Right click → create
-
Select your Service and the Person
-
Tick is allowed to log in
-
The user name is their first name@suffix (database name) -all lowercase
-
Enter password twice
-
Permissions – select relevant permissions or Custom and tick applicable boxes
-
If the staff member is to receive Spike daily processing summaries Manage CCS Services must be ticked and an email address entered under their Person.
To edit a user account, right click on username → edit
To reset a password, right click on username →Set Password. Enter password twice.
Adding Personnel onto Spike Maintenance
Persons with Management or Control of the Provider and/or persons with Responsibility for the Day to Day Operation of a Service who are required to update provider or service personnel records must be entered into Spike Maintenance.
For more information and instructions see adding personnel in Spike Maintenance.
PRODA Reactivation
Provider Digital Access (PRODA) is an online identity verification and authentication system that lets you securely access your b2b device. Your b2b device enables your service to access the CCS system via Spike.
For security reasons you need to re-activate your b2b device every 6 months.
If your b2b device becomes inactive your Service will no longer be linked to the CCS system and your families will not receive their subsidies.
There are 2 ways to re-activate your PRODA device:
-
In spike go to System → Proda Website
-
Enter your PRODA login details (this must be the person with the attribute that enables them to access the b2b device)
-
Enter the 2 Step verification code
-
You will be taken to the PRODA homepage
-
Click on My Organisations at the top right hand corner
-
click on your Organisation Name (in pale blue font)
-
The next screen displays your Organisation Details. Record your PRODA RA (Organisation) number
-
Scroll down to B2B Devices box, click on drop arrow and select your device (usually spike)
-
You will be taken to the Details for Device page
-
If you have the option to “Extend B2B Device Expiry”, select this → yes.
-
Your PRODA device has been re-activated. Log out of PRODA.
(ONLY FOLLOW THE STEPS BELOW IF YOU DO NOT HAVE THE “EXTEND B2B DEVICE EXPIRY” OPTION)
-
In Spike go to System → Proda Website
-
Enter your PRODA login details (this must be the person with the attribute that enables them to access the b2b device)
-
Enter the 2 Step verification code
-
You will be taken to the PRODA homepage
-
Click on My Organisations at the top right hand corner
-
click on your Organisation Name (in pale blue font)
-
The next screen displays your Organisation Details. Record your PRODA RA (Organisation) number
-
Scroll down to B2B Devices box, click on drop arrow and select your device (usually spike)
-
You will be taken to the Details for Device page
-
If your device is active select disable b2b device → confirm. (If it is inactive skip this step)
-
Click on Generate New Device Activation Code and record it accurately or you can right click copy the activation code and paste into Spike Maintenance
-
Minimise the PRODA screen
-
In Spike go to System → Spike CCS Maintenance
-
Log in using your Spike username and password (If you get a blank screen make your default browser Google Chrome)
-
Under Services click on your Service name
-
Click on device name (if you get a red CCS not available at the top, click on the X to the left and continue)
-
On the next screen click on the three dots at the top right hand side
-
Select Register
-
Paste or enter the activation code and Org ID (PRODA RA Organisation number)
-
Click on Register
-
Click on the three dots again at the top right corner → Verify
-
If the re-activation has been succesful you will see a green band with “Successful Verification” at the top of screen
-
You can now logout of Spike CCS Maintenance and PRODA
PRODA device management
It is extremely important to keep Members up to date on PRODA. If you require assistance with change of memberships contact the PRODA helpdesk on 1800 700 199. More information can be found at https://www.servicesaustralia.gov.au/organisations/business/services/proda-provider-digital-access
Inclusion Support Subsidy
ISS cases, once approved, will flow through into Spike automatically.
To see if it has been received by Spike go to:
Reports → CCS → Inclusion Support Cases.
This report shows the case number, hours approved and hours claimable per week. Also if there are any non-face to face hours and/or Pupil free days.
A child’s session reports must be sent to the CCS system (finalised) at least 3 days prior to claiming ISS.
To Create an ISS Claim
-
Go to Select Service (select your Service)→ Employees
-
Double click on Employee name → Attendances Tab
-
Select the relevant week
-
Right Click → Create
-
Enter start / finish times and date (you can only do one day at a time)
-
Tick Claim ISS Entitlements
-
Select Case - it should show in the dropdown box (if it doesn’t it means it has not filtered through to Spike yet)
-
Tick Additional Educator Box
-
Click OK to the Additional Educator Declaration
-
Provision is either Face to Face or Non-Face to face (eg. If the child is absent but you have already rostered a staff member on)
-
Payment – is either Centre Based Care or Pupil Free Day
-
The initial claim can be copied and pasted - saving time
Once you have created the claim you can run a report to confirm all details are entered correctly:
Reports > CCS > Inclusion Support Child and Staff Attendances.
|
Tip
|
If a staff member has (*) after their name it means that you have not ticked the Additional Educator Box – you will also get a warning on your processing summary stating “The sum of additional hours is not equal to hours claimed” |
Spike’s EFT System
Spike uses a payment gateway to process payments via direct debit or credit card, which is automatically reconciled against their fees
Why use an EFT System?
Increased cashflow – no need to wait for parents to pay you, you can be in control of the direct debit / credit card payments. You can set up a payment plan for your families – eg they can pay current fees and if required make extra payments for an outstanding debt. Automatic receipting. Reduces data entry.
If you think Spike’s EFT System is for you, follow these steps:
-
For assistance with getting started request a Spike Helpdesk Callback or email the helpdesk at helpdesk@economicoutlook.net
-
If you already have your own internet merchant facility, then please discuss this with the Spike Help Desk.
-
Visit the Paystream website at www.paystream.com.au/register/spike and complete the online application form. To complete the application form, you will need to provide the details listed below.
-
Company details
-
Contact details
-
Business activity details
-
Director details
-
Banking details
-
A copy of your bank statement
-
Once you have signed up, participating parents/guardians must complete and sign a direct debit authority. You can find these in Spike Viewer, go to Reports → EFT → Paystream → Direct Debit Authority. This will give you permission to debit their bank account or credit card for fees payable. For Terms and Conditions, go to Reports > EFT > Paystream > Terms and Conditions TO SET UP SPIKE’S EFT SYSTEM
USING RECURRING PAYMENTS (Create EFT Authority BEFORE the EFT Schedule)
Create EFT Authorities Go to: Select > Account > Fees Right click > Create EFT Authorities Right click Create. Enter dates, payment method (either bank account or credit card) and the payment details. OK.
2 Create EFT Schedule Whilst in fees tab right click > Create EFT Schedule Enter dates (we recommend the start date is a Saturday), Frequency, Gateway (Paystream), maximum deduction and Cost Centre.
USING MANUAL/ ADHOCK/ ONE OFF PAYMENTS 1 Create EFT Authorities Go to: Select > Account > Fees Right click > Create EFT Authorities Right click Create. Enter dates, payment method (either bank account or credit card) and the payment details. OK.
2 Create EFT (one-off) Payment Whilst in fees tab > right click > Create EFT Payment Enter the details for the one-off payment
We recommend that all schedule beginning dates are a Saturday for all accounts. This is because Paystream will only create a payment from an account once in a 7 day period.
3 To Generate Recurring Payments
Once attendances have been sent to Canberra and CCS has been applied to your families accounts go to: Select service → Billing → right click → Select all → Create EFT Payments A list of all of the accounts using Paystream will display: Transactions that are within schedule constraints are pre-ticked. Transactions with an orange tick are pre-ticked but are slightly different from previous payments. You may want to check the amount. Transactions with a red dot require you to manually tick. This may be the first time this account has used Spike’s EFT payment system. Once you have checked all transactions and they have a tick, click ok.
REPORTS
EFT Client Details Lists details of all accounts using Paystream, including, Name, Dates, Max Deduction (credit), Frequency, Status
EFT Settlement Shows all successful payments
EFT Transaction Detail Shows all details of each transaction by account.
EFT Transaction Progress Shows progress of each EFT transaction for a given date range, including, EFT response eg. If transaction is successful and if not why?
It is EXTREMELY IMPORTANT to run this report weekly to ensure payments are successful. PENDING TRANSACTIONS ARE TRANSACTIONS THAT HAVE INCORRECT CREDIT CARD OR BANK ACCOUNT DETAILS. THEY REMAIN PENDING UNTIL THE CORRECT DETAILS ARE ENTERED. PENDING TRANSACTIONS DO NOT DISHONOUR AS SPIKE HAS NOT RECEIVED CLEAR INSTRUCTION FROM THE FINANCIAL INSTITUTION.
Spike FAQ’s
For frequently asked questions see our Spike FAQ’s manual.