Introduction
The electronic attendance system takes the hard work out of entering actual attendance times for administrators by allowing parents and their collection authorities to record a child’s arrival and departure.
The system also incorporates:
-
Messages - Parents and staff can leave attendance notes about children to each other. Staff can issue group or service wide announcements and alerts to parents.
-
Immunisation reminders - If the service issues immunisation reminders, parents and staff can view a child’s immunisation status and clearly see which children are due or over-due.
-
Emergency contacts - In an emergency, staff can access and call or text a child’s contacts from within the app if the device has the capability. Children’s real time attendance status is clearly displayed at the service or group level.
-
PIN code management - Parents can change their own PIN once they have signed in. Staff can reset PIN codes for parents who don’t know it or forgot it.
-
Contactless Signing - Parents can sign their children in and out by way of a QR code.
Installation
The attendance webapp can be installed on most phones, tablets, laptops and desktops. Services usually have 1 or more dedicated devices placed in a foyer or room that’s secure and easily accessible by parents.
We also recommend the app be installed on a staff phone so during an emergency it can be used to access and call a child’s emergency contacts.
Weekly booking sheets are still needed as a fallback for:
-
Forgotten or unknown PIN codes.
-
Temporary internet issues.
-
Power failures.
-
Unexpected attendances.
Electronic attendance webapp address
Before installing on a device you need to know the electronic attendance’s unique webapp address for your organisation.
This can be found by going to Menu → System → 'Spike Electronic Attendance' in the SpikeViewer which will open the app in your browser. The address normally looks like https://demo.spike.economicoutlook.net/admin/attendances/ except 'demo' would be replaced with your organisation’s suffix (the part after the '@' symbol in your Spike username).
Instructions for iPhone and iPad devices
-
Open the safari web browser.
-
Enter the electronic attendance’s webapp address.
-
You should now see 'Please enter your organisation suffix'.
-
Select the share button on your browser menu.
-
Scroll down and select 'Add to Home Screen'.
This will install the app and place a Spike icon called 'Attendances' on the home screen where it can be launched from in future.
Instructions for Android phone and tablet devices
-
Open the chrome web browser.
-
Enter the electronic attendance’s webapp address.
-
You should now see 'Please enter your organisation suffix'.
-
Select 'Add Attendances to Home screen' when prompted.
This will install the app and place a Spike icon called 'Attendances' on the home screen where it can be launched from in future.
Instructions for Windows and MacOS devices
Whilst the electronic attendance app is optimised for touch screen devices, administrators can easily access it directly from their desktop or laptop device. Go to Menu → System → 'Spike Electronic Attendance' in the SpikeViewer which will open the app in your browser, you can then bookmark this page where it can be launched from in future.
Post installation tips
To maximise ease of use for parents, the attendance app should always be running and displaying the 'Please enter your PIN' prompt.
Some recommendations to ensure this happens include:
-
Keeping the tablet plugged in to AC power.
-
Disabling any screen timeouts.
-
Disabling password and pin protected lock screens.
-
Putting the attendance app into kiosk mode.
-
Prior to parents arriving, have staff check their tablet is on and awake at the PIN prompt.
PIN code access control
The electronic attendance app uses PIN codes to uniquely identify who has signed children in or out of a service. It’s equivalent to a signature, so it is important PIN codes are not shared between parents and collection authorities, otherwise the service cannot be confident who really dropped off or picked up a child.
People by default are allocated a random 6 digit PIN or their mobile phone number if specified by an administrator in the new account or person wizard. Parents and collection authorities will need to be issued their PIN code before they can record a child’s attendance.
Issuing PIN codes to parents and collection authorities
PIN codes can be issued to parents in a number of ways:
-
If parents have installed the 'Childcare' app on their device, they can see their own PIN code by selecting 'Personal details' in the home screen.
-
Staff can use the attendance app to reset a parent’s PIN code when that parent is on-site.
-
Administrators using the SpikeViewer can find the person’s PIN code and write it down or reset it for them.
-
Give staff a copy of the 'Person Pin Code List by Group' report. Administrators can run and print this report using the SpikeViewer by going to Menu → Reports → 'Person Pin Code List by Group'. This report is for staff only and must not be made available to parents.
Parents wanting a different PIN code
It is extremely easy for a parent or collection authority to change their own PIN code. Using their current PIN, they start the sign in process then select the person icon in the top right corner and follow the prompts. If the PIN is already in use an error message will appear.
Staff PIN code management
Staff can change their own PIN code in the exact same way parents and collection authorities do, they can also reset any parent’s PIN code by selecting 'Manage PINs' from the menu icon in the top right corner.
Administrators PIN code management
Administrators can use the SpikeViewer to view and manage a person’s PIN code. Go to Menu → Select → Person → 'Details tab' and the person’s PIN will be displayed.
To change the PIN code:
-
Double click on the PIN code in the details tab.
-
Change the PIN code.
-
Press 'Finish'.
|
Note
|
PIN codes changed in the SpikeViewer will take time to come into effect within the attendance app. |
Recording attendances and absences
Once the electronic attendance app has been installed on a device and people have been issued their PIN code, they can start recording children’s attendances at the service.
Parent’s sign in and out process
The sign in and out process is designed to be as quick and as simple as possible:
Parents can use their mobile phone’s camera app to scan the QR code. Once the signing page is open on their device they can
-
At the 'Please enter your PIN' prompt, parents and collection authorities enter their PIN code then select continue.
-
Any child they have collection authority for and is expected to attend will be displayed.
-
They select the children that are arriving or leaving and confirm.
-
The screen will return to 'Please enter your PIN' and a small notification will briefly be displayed indicating if the attendance(s) were successfully recorded or not.
During this process if a staff member or administrator had previously recorded a child’s attendance time the parent will be asked to verify it. A notable exception is OSHC services where staff genuinely record child arrivals and departures. Past attendances can be verified at the same time children are recorded as arriving or leaving. Verification of attendance times by a parent or collection authority is required for audit purposes.
|
Note
|
The time a PIN code was entered will be the recorded time of arrival or departure. |
Staff sign in and out process
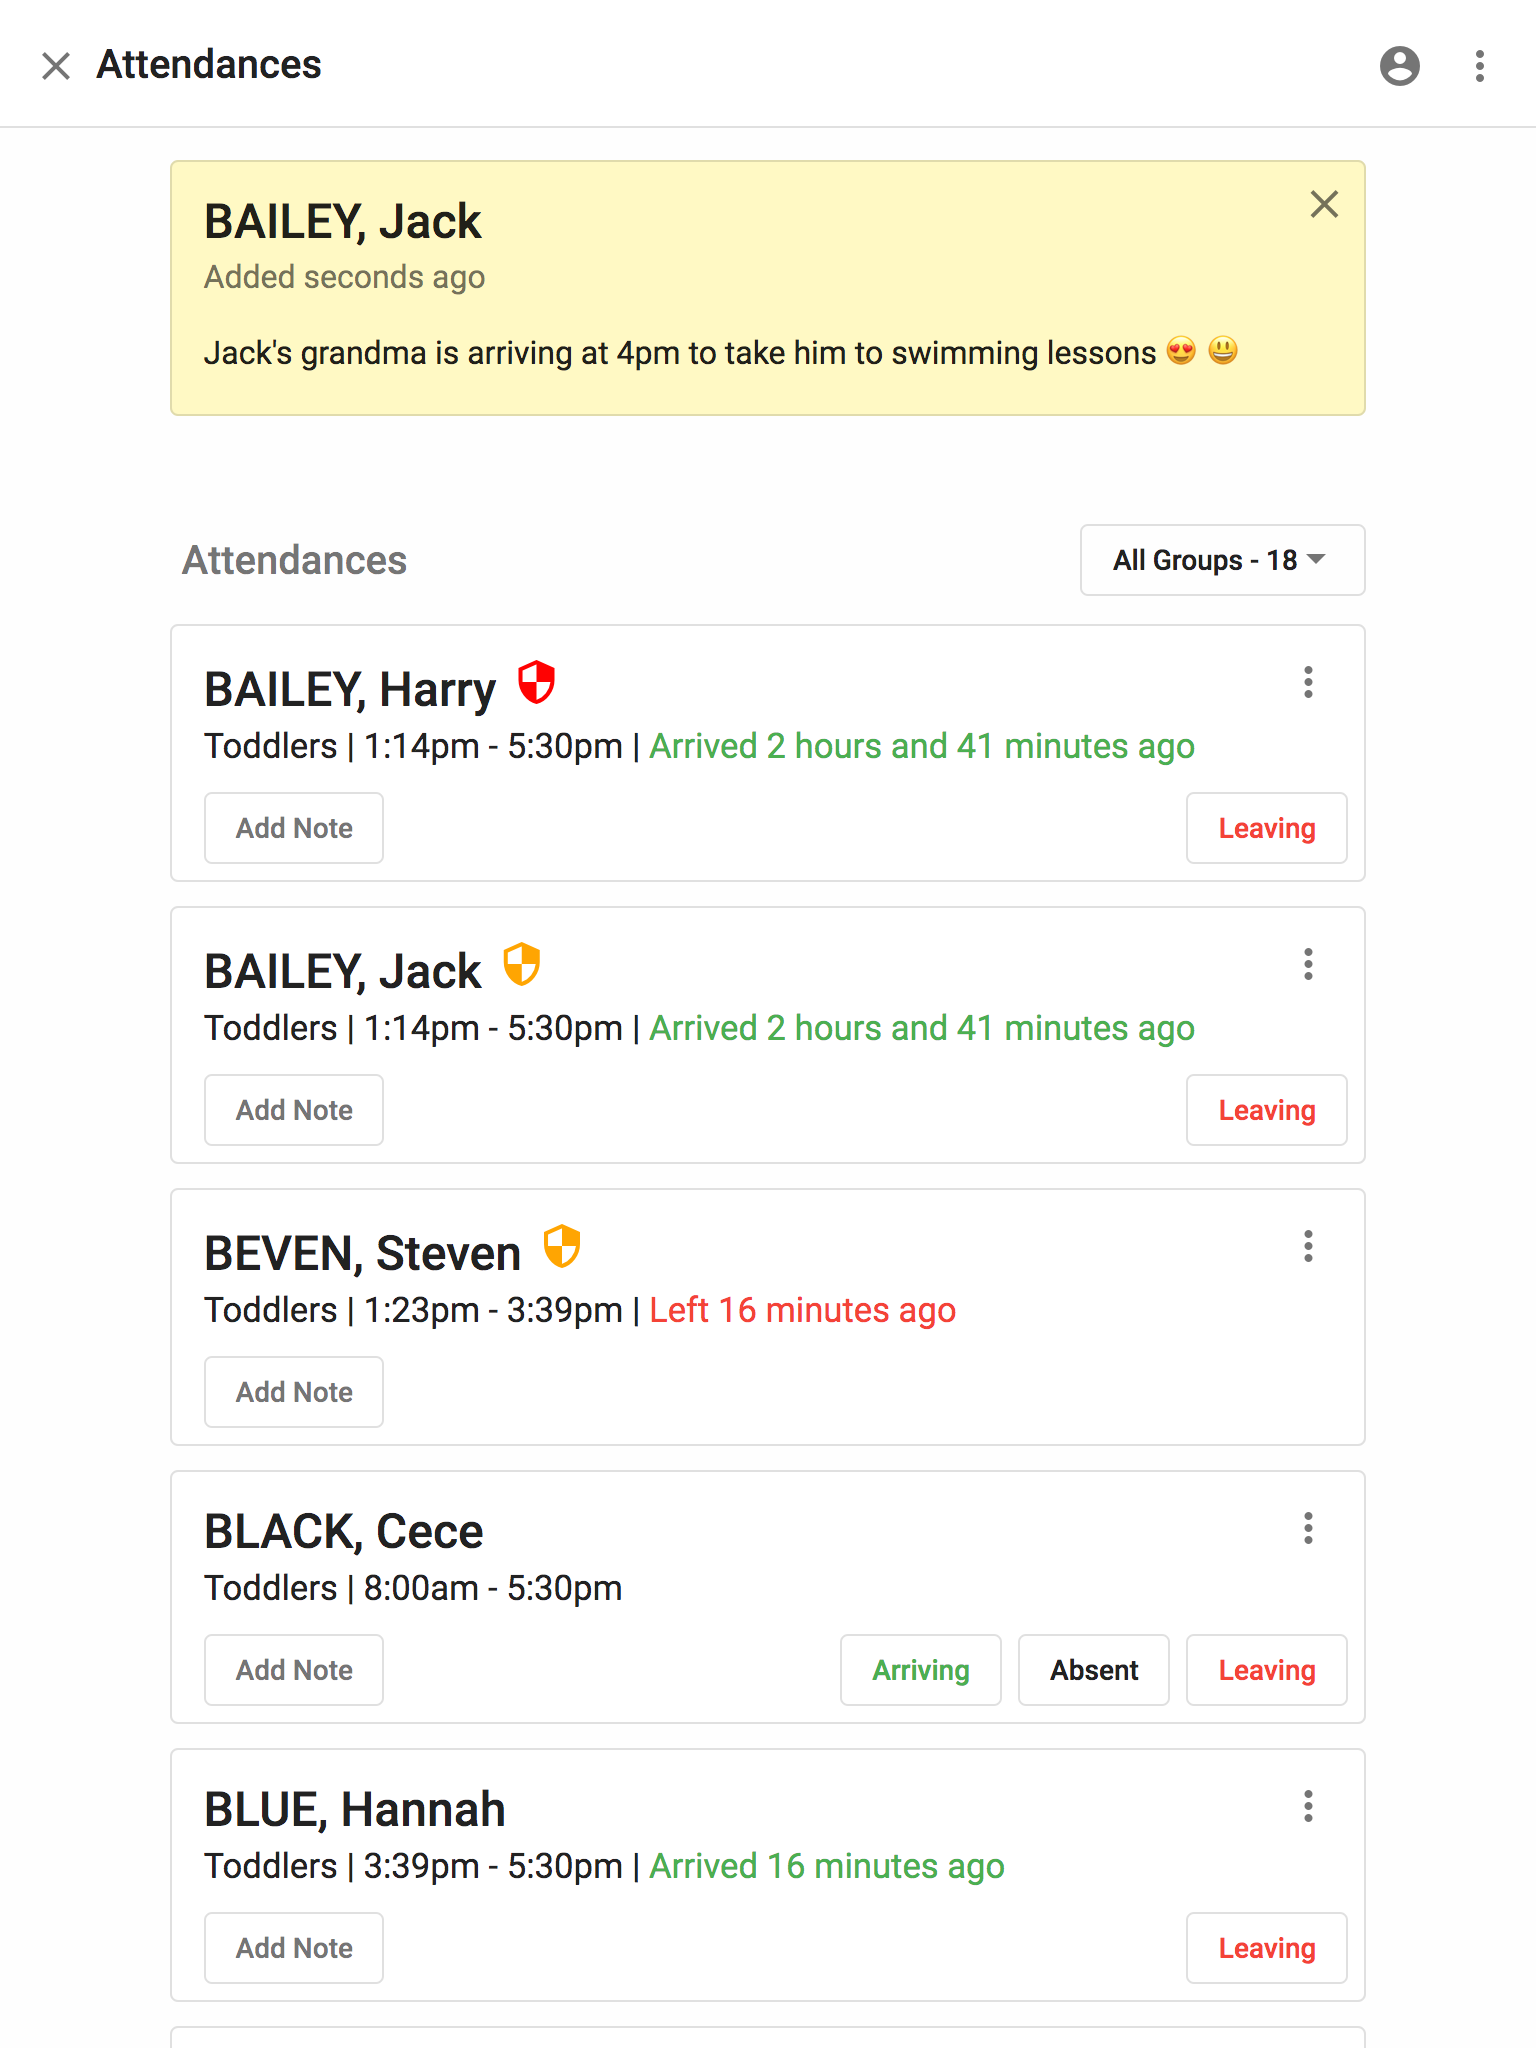
The sign in and out process for staff is the exact same process that’s used by parents except staff can manage all the children that are expected to attend. Staff can view children for the whole service or by group and see group utilisation in real time. Arrivals, departures and absences can be recorded in bulk during this process.
Discourage staff from leaving the list of attendances showing for too long because the PIN code entry time is used as the recorded arrival or departure time.
Administrators using the SpikeViewer
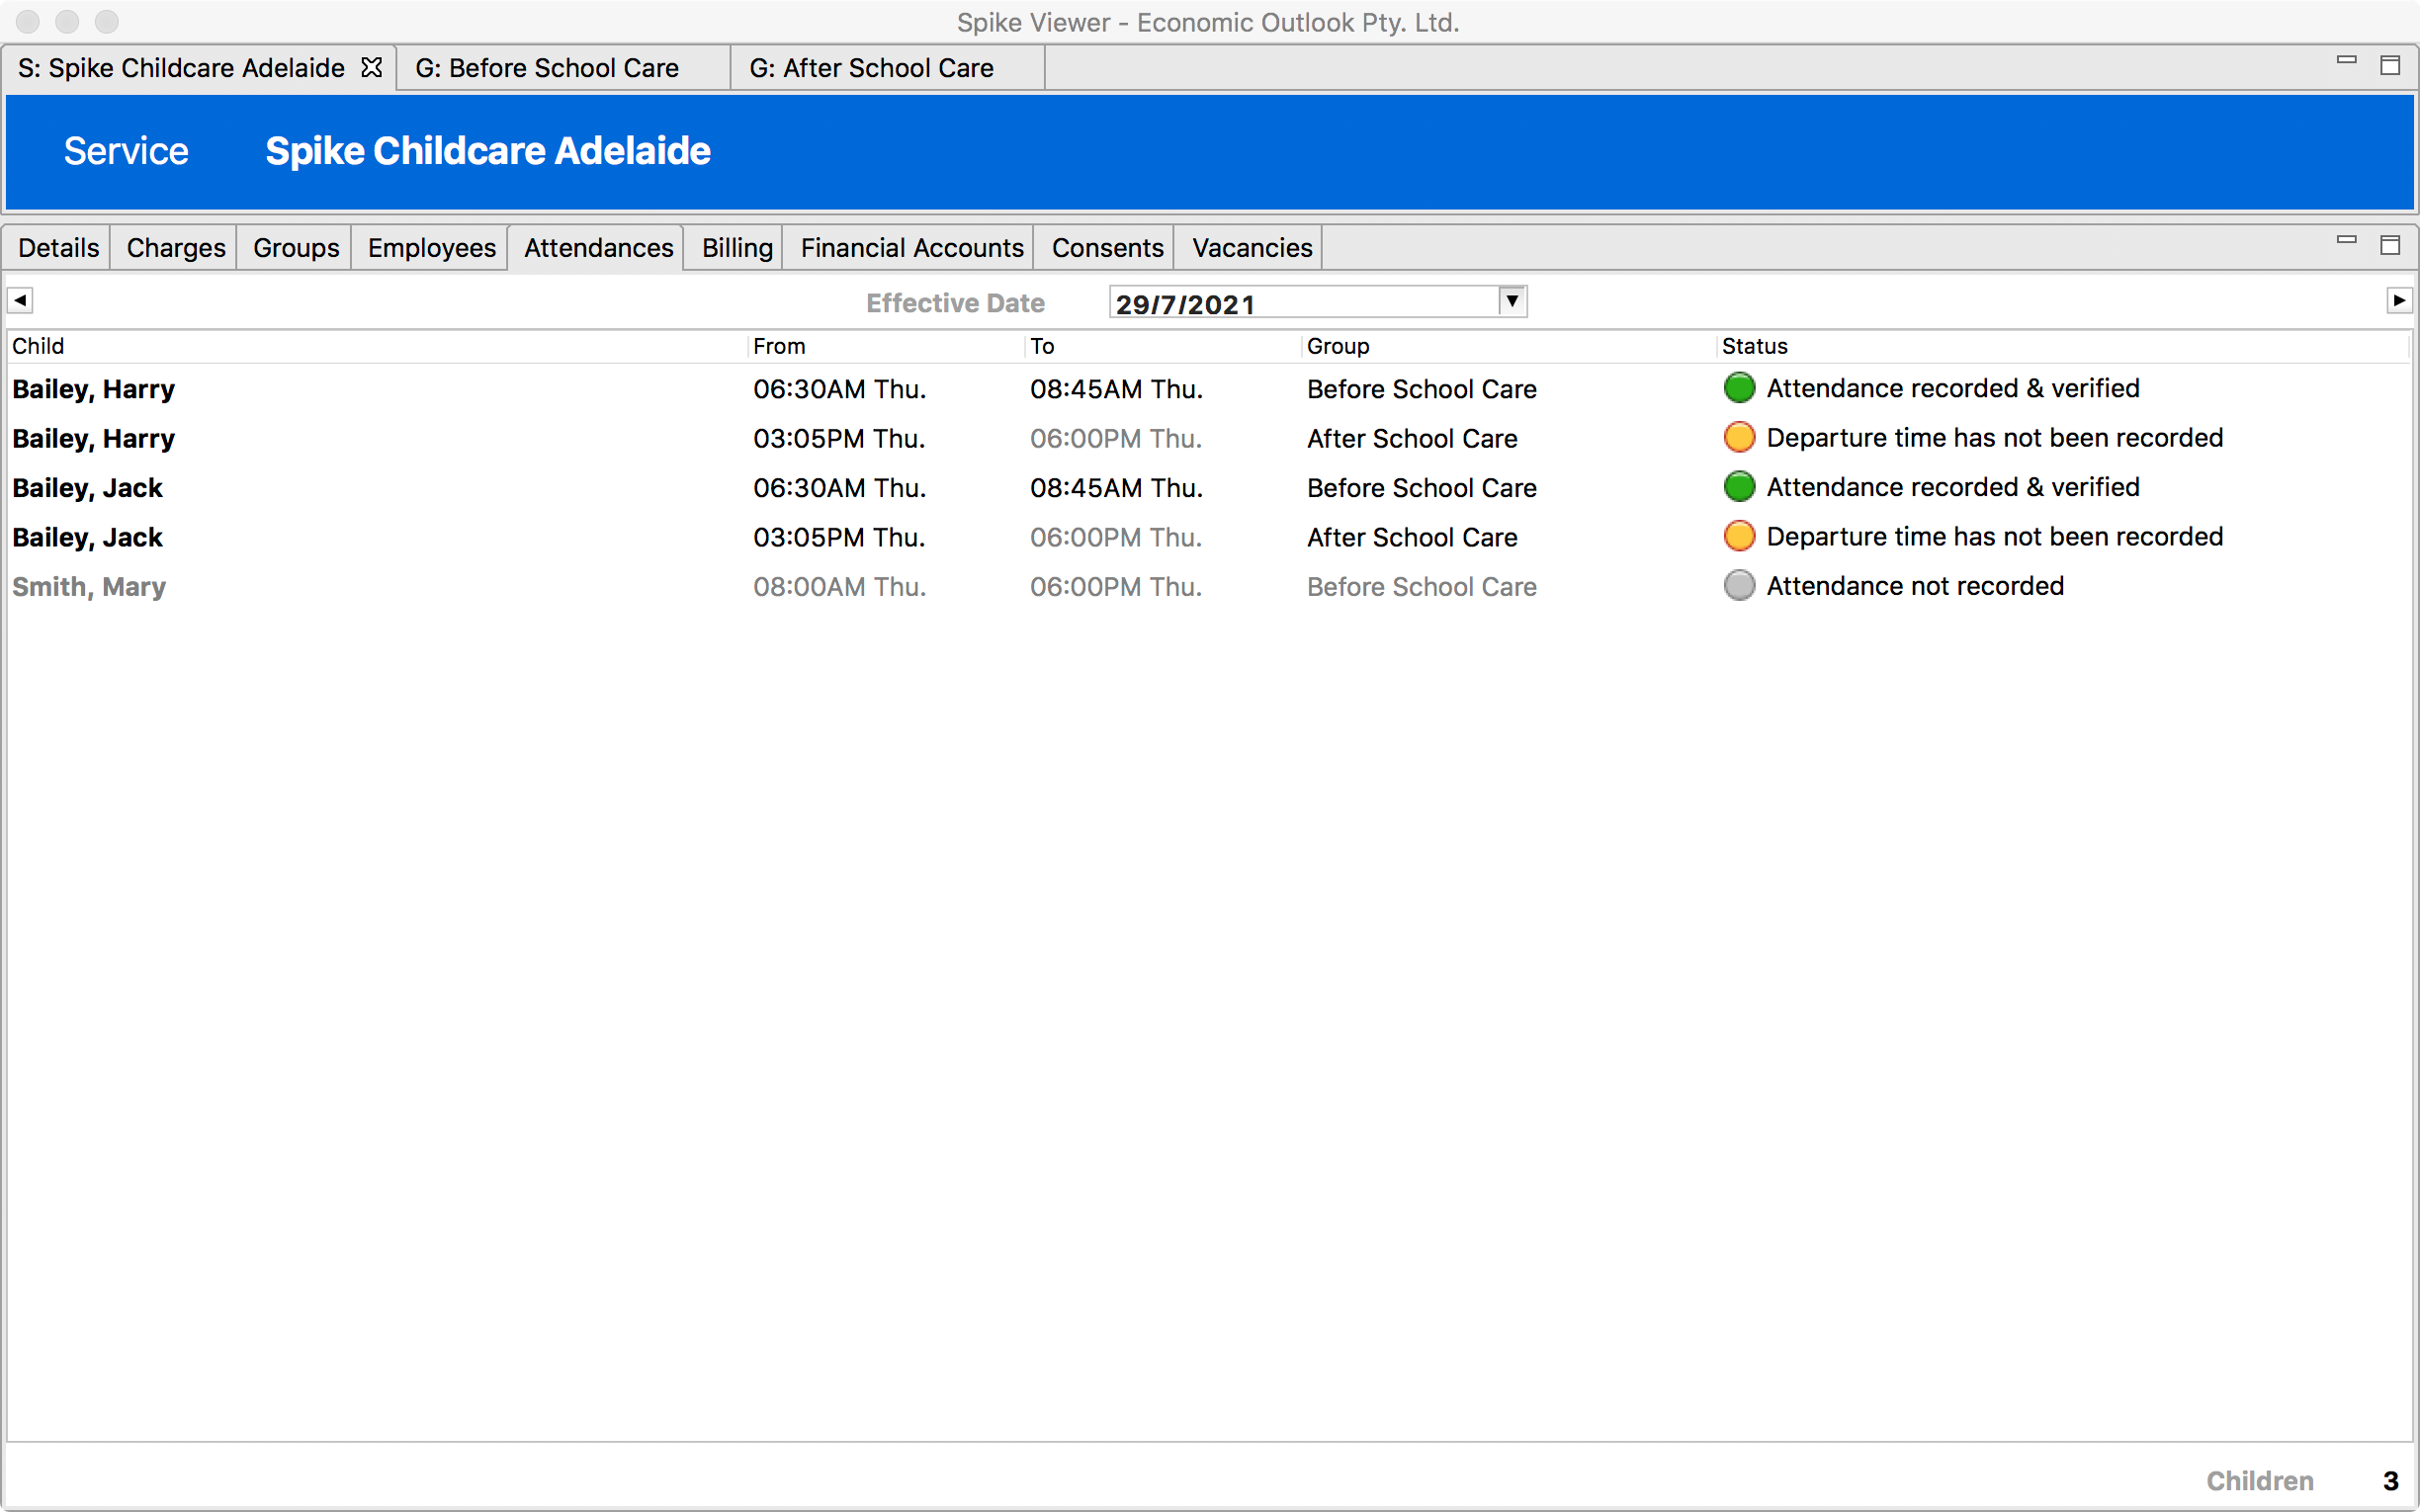
To view and manage the service’s attendances in the SpikeViewer, go to Menu → Select → Service → 'Attendances tab' and make sure today’s date is selected.
As children arrive or leave throughout the day their attendance status and times on this screen will reflect those recorded events. Attendance times will turn from grey to black to indicate an actual attendance time rather than an expected time (booked time).
During peak pickup and drop-off periods the SpikeViewer is updated approximately every 5 minutes to show any newly recorded attendance events. As pickup and drop-off usage slows so does the frequency the SpikeViewer is synchronised. If you want to temporarily increase the sync frequency back to 5 minutes, simply enter your PIN code into the attendance app.
The most common attendance statuses seen are:
-
'Attendance not recorded' - There is an expectation the child would attend based on a non absent booking but no arrival time has been recorded yet.
-
'Departure time has not been recorded' - The child has a recorded arrival time but has not yet departed.
-
'Attendance recorded & verified' - The child has an actual time of arrival and departure recorded.
-
'Attendance recorded' - The child has an actual time of arrival and departure recorded but a collection authority has not electronically verified those times.
It is important to check on past attendances and make sure they all have a status of 'Attendance recorded' or 'Attendance recorded & verified'. Past attendances that don’t will need to have their times manually recorded or have it’s associated booking marked as absent.
|
Tip
|
To view a particular child’s booking associated with an attendance, double click on the relevant child’s name. |
Recording attendances
If a past arrival or departure time has not been recorded, you may need to check the room’s attendance sheet or ask an educator for the appropriate time and manually record it on behalf of the parent.
To manually record an attendance:
-
Double click on the relevant attendance’s time.
-
Set the correct times.
-
Click 'OK'.
Attendances recorded in this way can be verified by parents the next time they attend the service.
Recording absences
If a past attendance does not have any times recorded it may mean the child did not attend. If a child did not attend an absence should be recorded against the attendance’s associated booking.
To record an allowable absence:
-
Right click on the relevant attendance.
-
Select 'Record Absence'.
This will mark the associated booking as absent and the attendance will no longer show in the list.
Recording attendances in bulk
If a service has a number of unrecorded arrival or departure times in a day the SpikeViewer can bulk record those times using their expected times (booked times). For combined services that provide onsite preschool this can be particularly helpful to record the times children move between different types of care.
To bulk record attendance times:
-
Make sure any attendance a child was absent for is not showing in the list. If they are record those absences.
-
Make sure the expected time for any unrecorded attendance time does not significantly deviate from when the child actually arrived or left. If they do record those attendances individually.
-
Right click anywhere in the list and click 'Select All'.
-
Right click anywhere in the list again and click 'Record Attendances'.
Any unrecorded attendances will now have their times recorded and show a status of 'Attendance recorded' or 'Attendance recorded & verified'.
Verification of attendances and auditing
For compliance with state and territory regulations, a child’s attendance at the service must be recorded and verified by a parent or collection authority. This requirement can be met manually using an attendance sheet to record a time and signature or digitally using the electronic attendance app.
If a staff member or administrator previously recorded a child’s attendance, parents will be asked to verify it during their next sign in process. However, parent’s cannot digitally verify an attendance if it’s too far in the past (6 weeks or more). In this situation a paper based signature is required.
To find and verify old recorded attendances:
-
In the SpikeViewer go to Menu → Reports → Group → 'Recorded Attendances Not Verified'.
-
Specify the date range of interest and click finish.
-
This will display any attendances not digitally verified.
-
Print the report and have it signed by the parents.
These signed sheets should be treated just like any other attendance sheet and be made available for audit. It is recommended administrators perform this process once a month or quarter if parents are not regularly using the electronic attendance app.
Recorded attendances and the weekly billing cycle
Accounts must have all their attendances and absences recorded for the week before they can be finalised. This means the service cannot bill every account until the last child has left for the week (usually close of business Friday).
Before finalising the accounts, administrators should review the week’s attendances and resolve any attendance not marked 'Attendance recorded' or 'Attendance recorded & verified'.
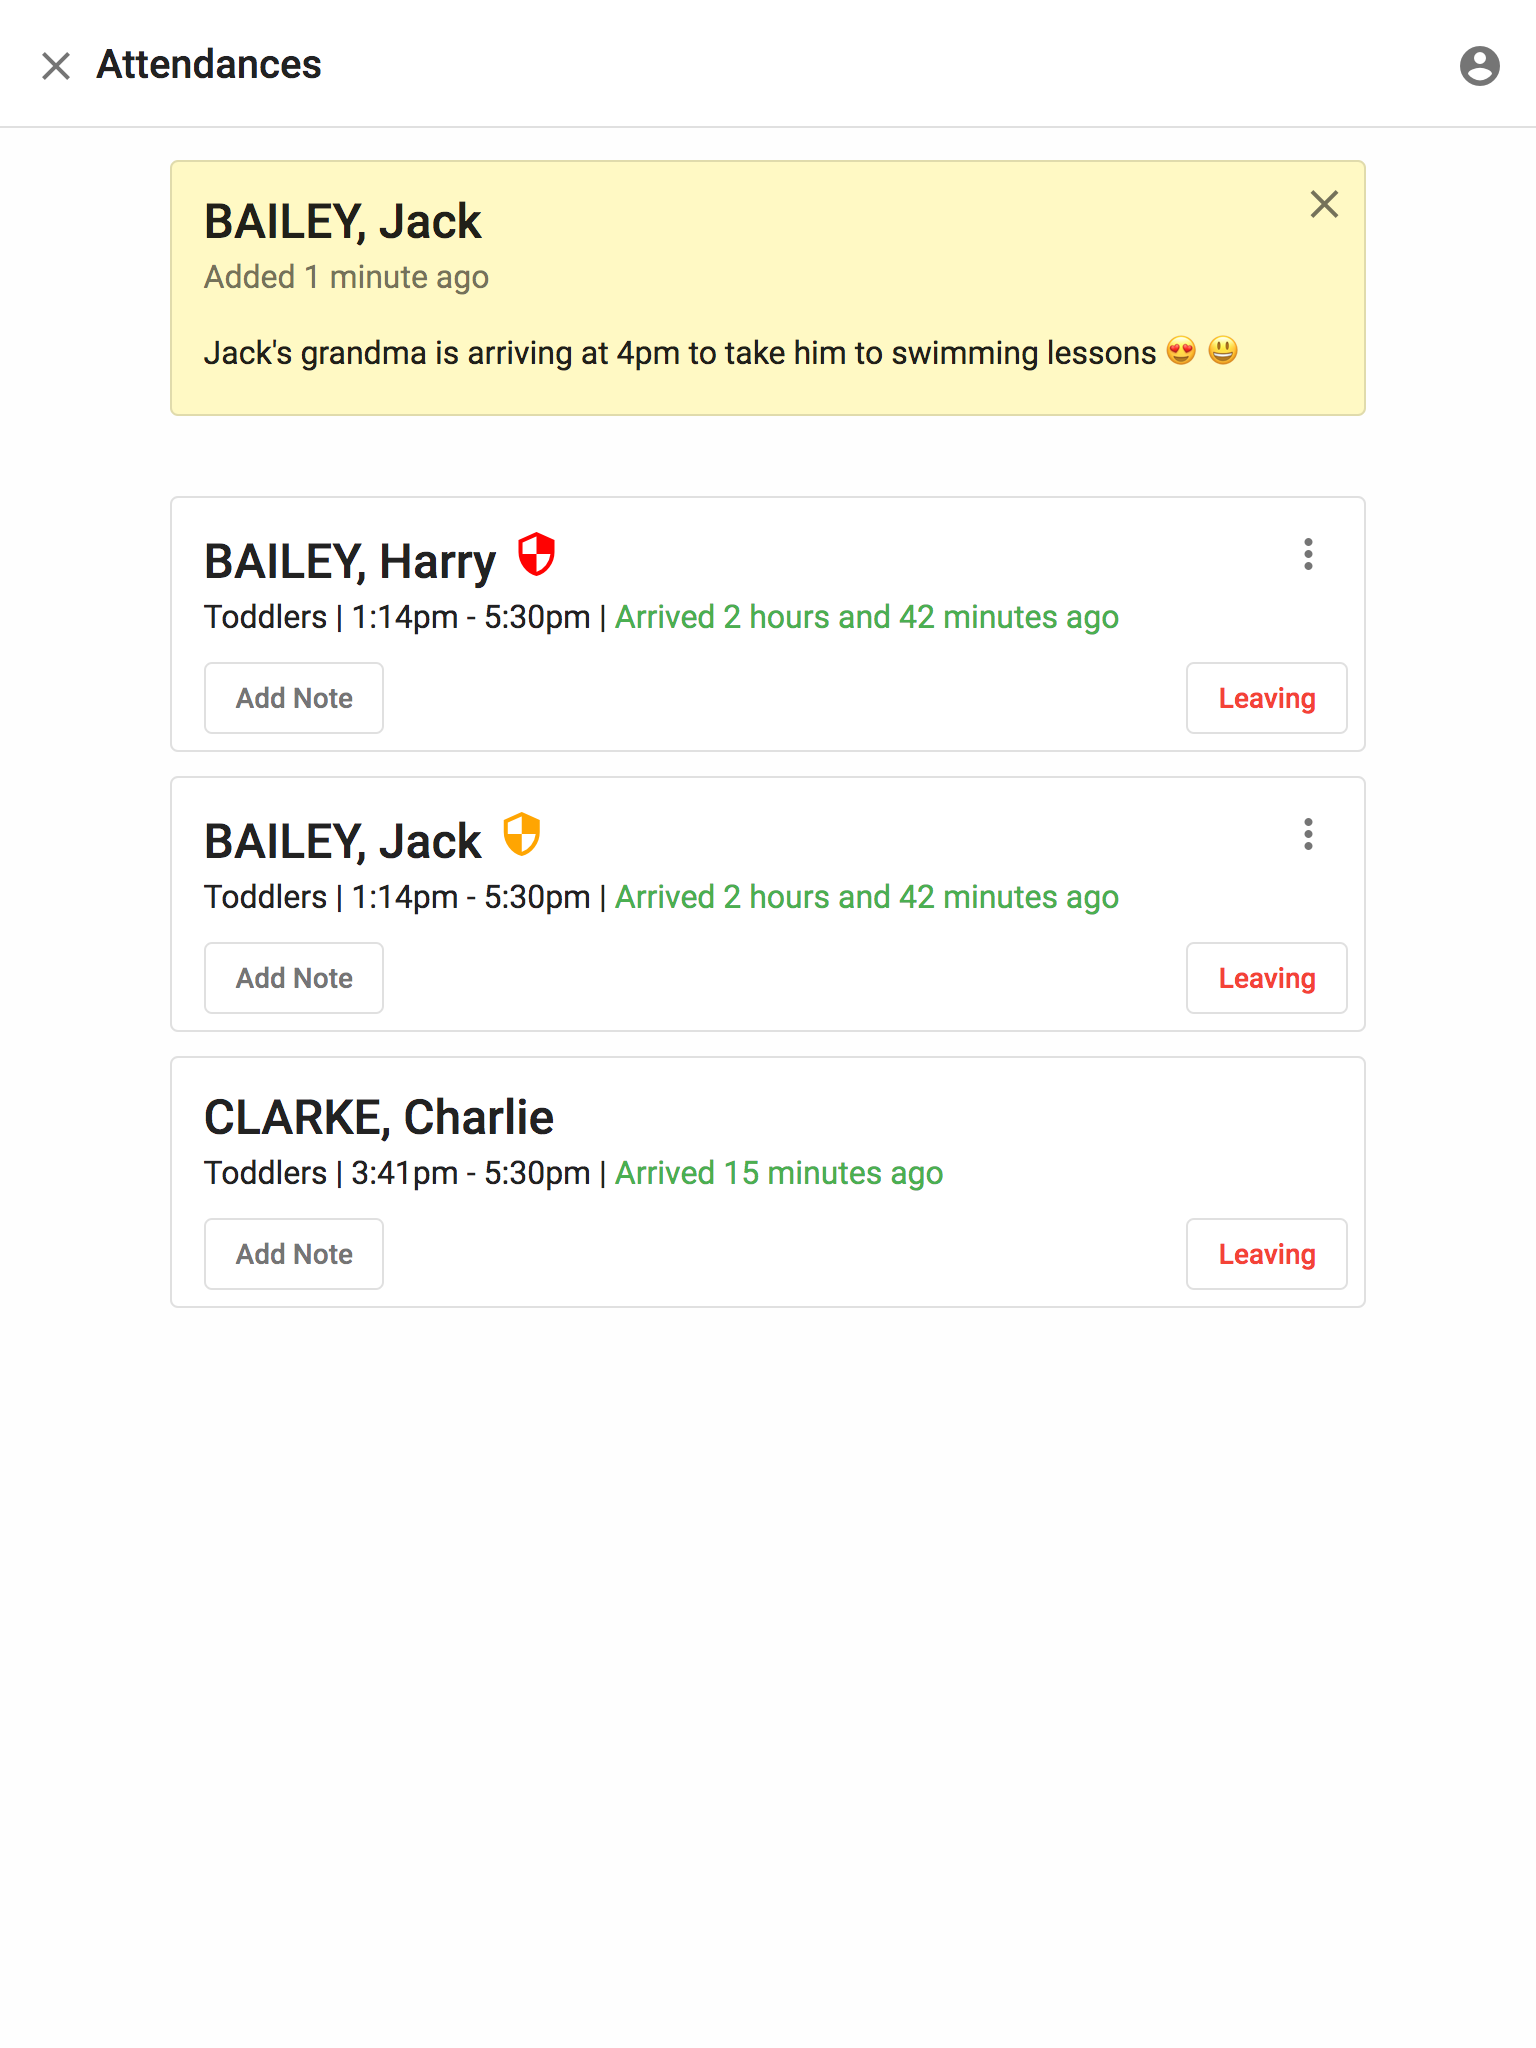
Messages
Messages provide a simple and convenient way for parents and staff to communicate with each other. During the sign in and out process parents and staff can see any active messages and write their own.
There are currently 3 types of messages:
-
Notes - A note is a simple message that always relates to a child on a particular day, it is the only type of message parents can write.
-
Announcements - An announcement is a simple message that’s addressed to a group or service and can be displayed to parents for 1 or more days.
-
Alerts - An alert is basically a high priority announcement that’s displayed more prominently.
Emergency contacts
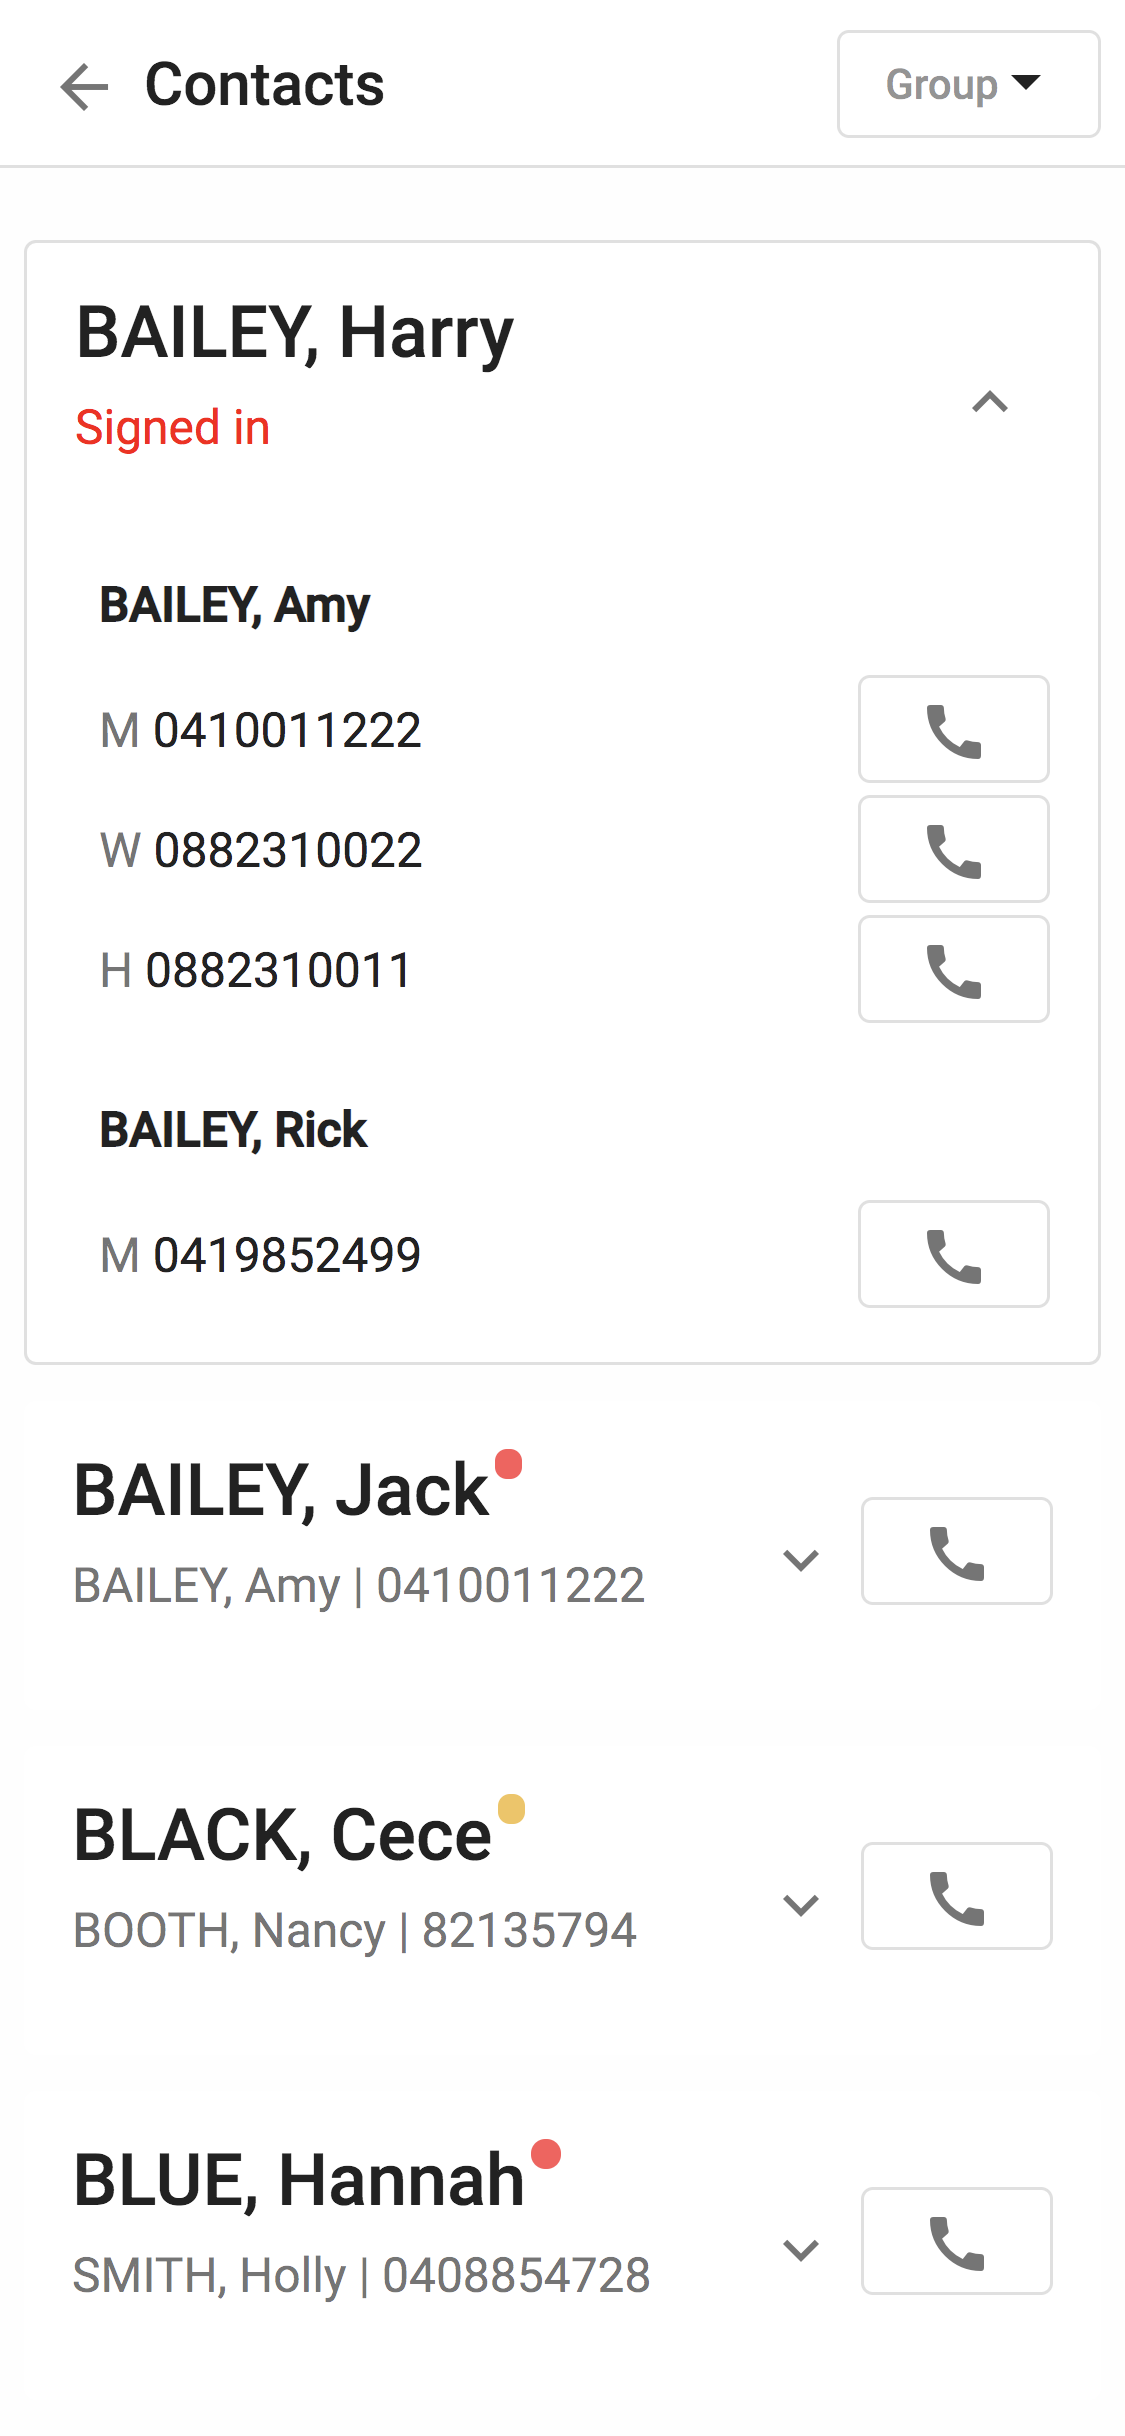
The electronic attendance app provides staff with an emergency contact list of children expected to attend the service. Selecting a child’s name will display all emergency contacts and collection authorities in contact priority order. If the device has dialling capabilities these contacts can be called or texted from within the app.
Children’s real time attendance status is colour coded to assist staff with head counts and can be viewed at the group or service level.
A child’s attendance status will be one of the following:
-
Red - There is a high degree of confidence the child is onsite.
-
Orange - It’s likely the child could be onsite.
-
Green - The child has left and is not expected to return.
-
Nothing - The child is not expected to be onsite right at this moment.
|
Important
|
This information must be combined with any arrivals or departures recorded on the attendance sheets. |
The electronic attendance app works just as well when offsite. For this reason we also suggest installing the app on a staff phone so if there is an emergency it can be used to call or text the children’s contacts. It is also helpful as a backup device if wifi is unreliable at your service or when on an excursion.
For completeness, emergency contacts also includes a list of 'Unexpected Attendances'. These children are not expected now or in the immediate future but have attended the service recently (within the last month or so).
Immunisation status & reminders
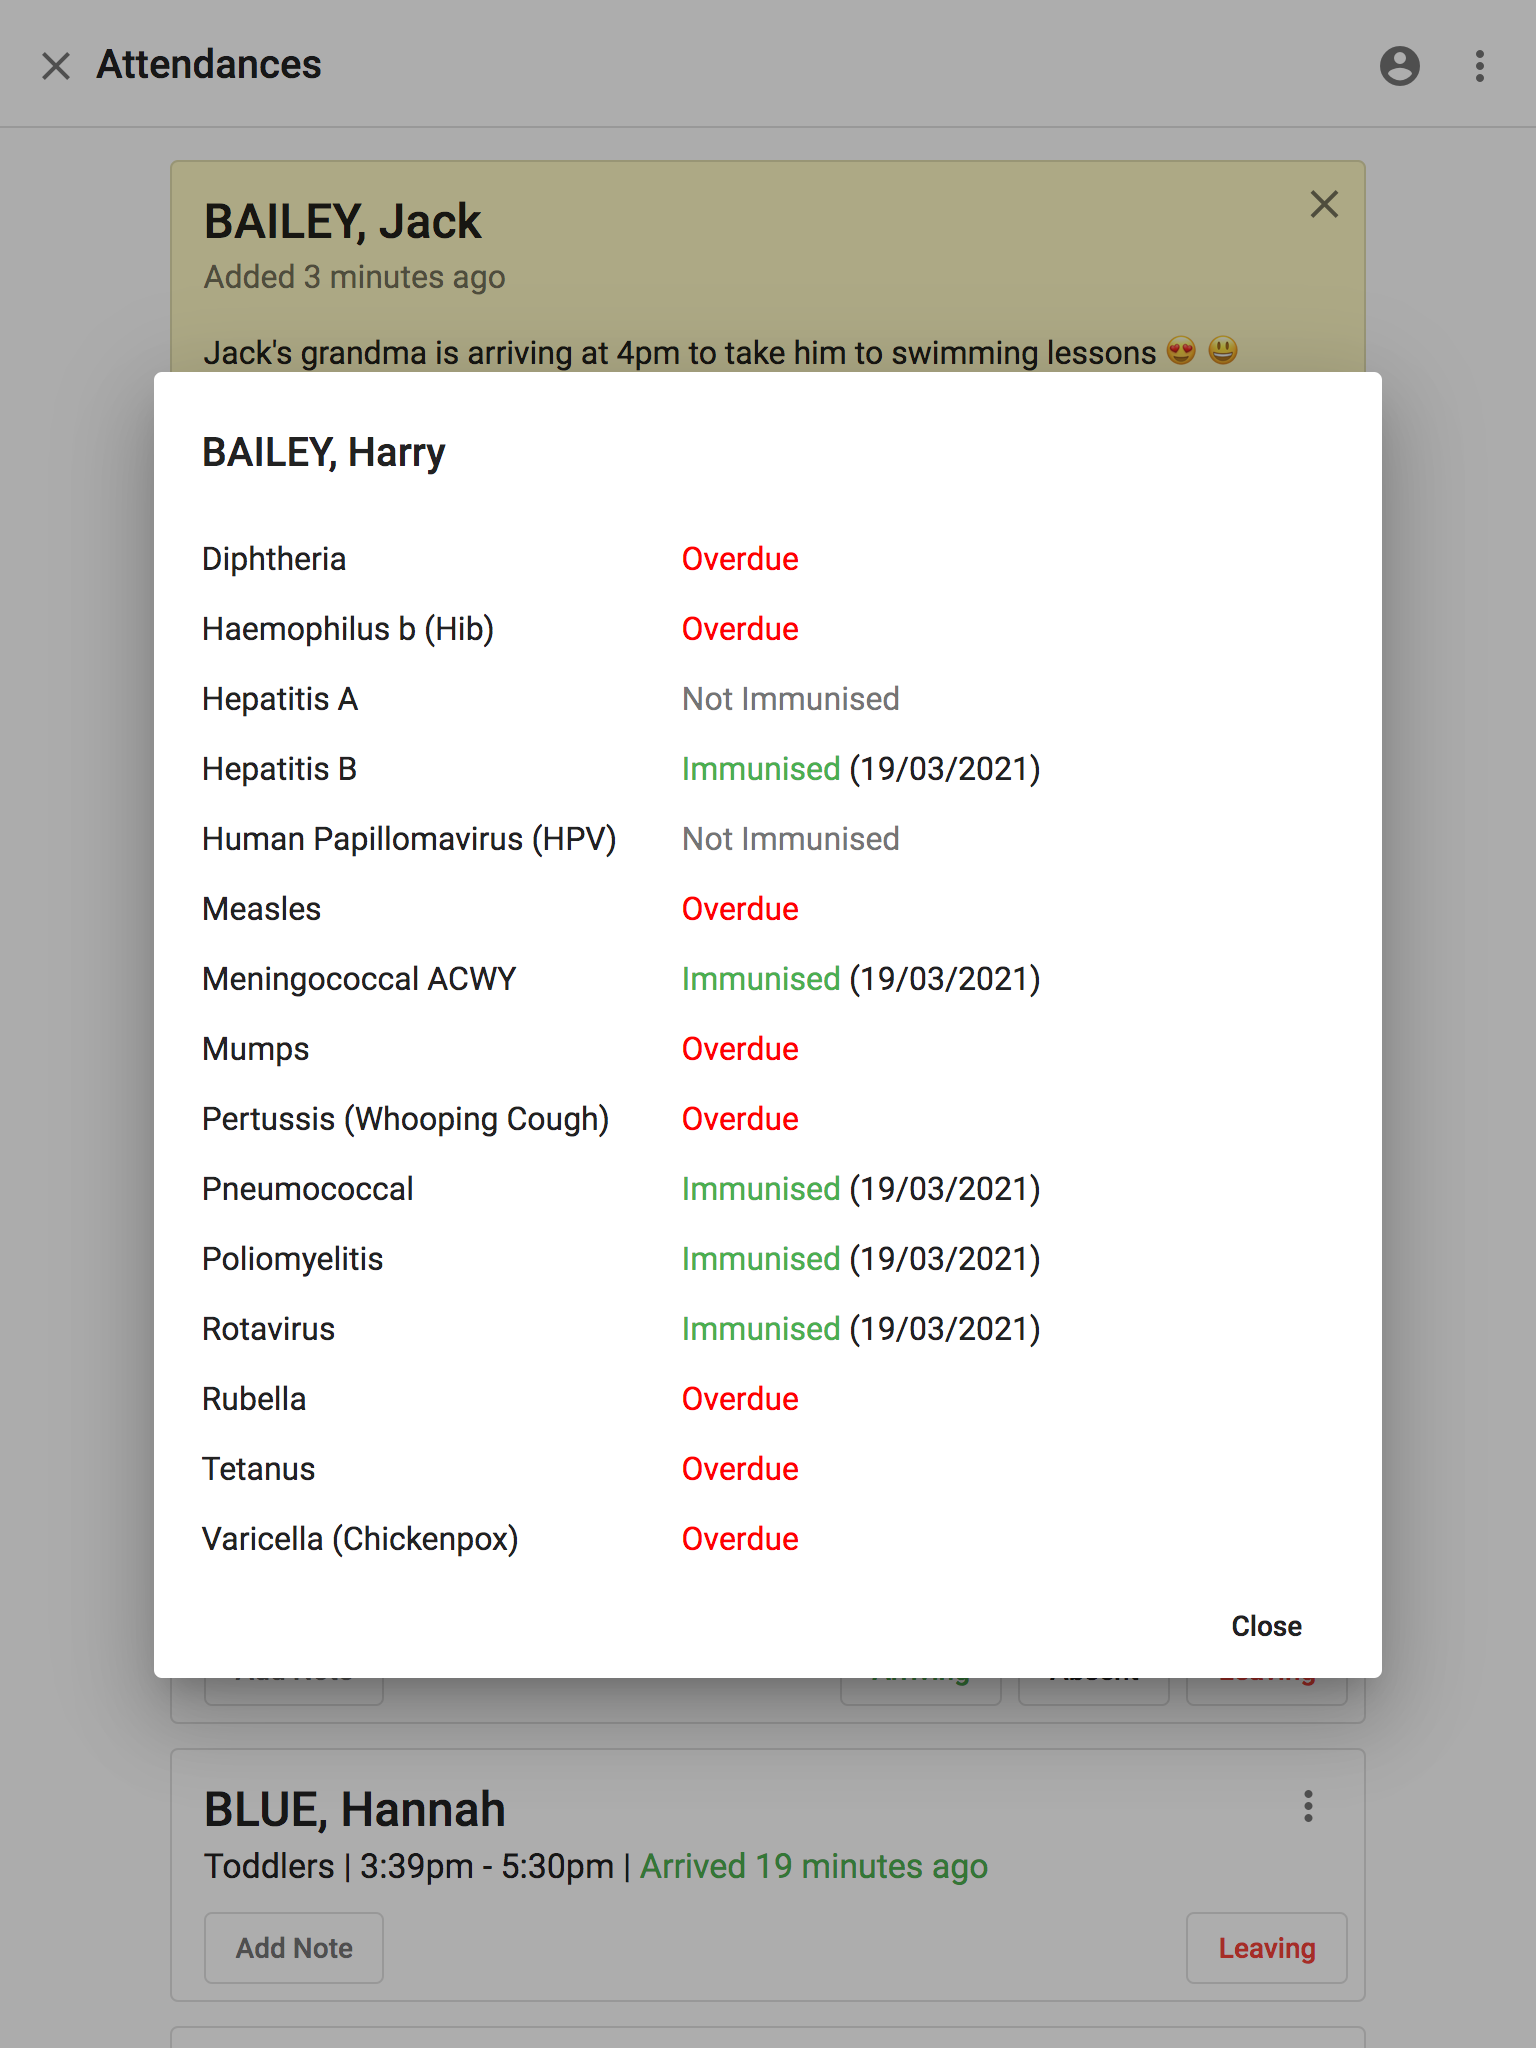
If your service uses Spike to issue immunisation reminder notices, a child’s immunisation status will be available in the electronic attendance app for parents and staff.
Any child considered due or overdue for an immunisation will have an orange or red shield next to their name, selecting the shield will show their status in full. This is important for services implementing a 'no jab no play' policy as every time a parent attends, they will be reminded for up to a month to get their child immunised before they can no longer attend the service.
Handy reports
The SpikeViewer provides administrators some handy reports related to electronic attendances.
-
Menu → Reports → Person → 'Person Pin Code List'
-
Menu → Reports → Person → 'Person Pin Code List by Group'
-
Menu → Reports → Group → 'Recorded Attendances Daily' - This report shows who has signed a child in and out.
-
Menu → Reports → Group → 'Recorded Attendances Daily Not Verified'
-
Menu → Reports → Group → 'Recorded Attendances Not Verified'
-
Menu → Reports → Group → 'Recorded Attendances Outside Charged Hours' - A report displaying children whose attendances are not within the charged hours. Can be used to charge late fees. Enter date range, select group/s, finish.